
Showing posts with label recipes - side dishes. Show all posts

Corn Casserole

Friday, November 26, 2010

I hope that you all enjoyed your Thanksgivings! The family time, the EATING... it is so great. I love Thanksgiving. Now, let the Christmas shopping begin!

I figured I'd post a few recipes that made appearances on our Thanksgiving table this year. They're a little bit different than your typical Turkey Day staples, so they're worth sharing.

First is this delicious corn casserole. I've also seen this called "corn pudding."
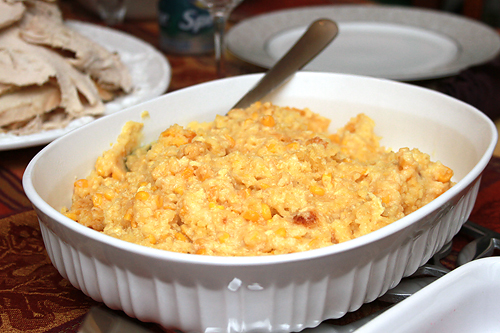

Michael and I first had this over a year ago, when we attended a birthday party at which I was hired as the photographer. Once my job was done, we were invited to eat with them--and part of the spread was this corn casserole. I wasn't sure about it upon first glance, but one forkful and I was sold. With sweet corn, creamed corn, and corn bread flavors, how can you go wrong? And with only a handful of ingredients to throw together, this is seriously easy as well.

The original recipe from Jiffy calls for the casserole to be baked in the oven. But a few weeks ago, as we were planning Nora's Baptism reception, I thought of this dish and wondered if it could be adapted to be cooked in a crockpot while we were all at church. A little Googling, and sure enough, I found a version for the crockpot. So now it's even easier.

Perfect as a side dish for a dinner at home, or to take to a potluck gathering, this corn casserole is sure to be a hit with almost any crowd. The recipe below serves about eight people (which was perfect for our Thanksgiving gathering), but when we had Nora's Baptism, we doubled it without any problems--we just made sure to cook in the crockpot for an extra hour or so.

Crockpot Corn Casserole
(Source: Cooks.com)

Ingredients:
- 1 can cream style corn
- 1 can whole kernel corn
- 8 oz. sour cream
- 1 stick butter or margarine, melted
- 2 eggs, beaten
- 1 box Jiffy corn muffin mix

Directions:
1. Spray pot with non-stick spray.

2. Combine all ingredients in a large bowl. Pour in crock pot.

3. Cook on low for 6-8 hours, or cook on high 3-4 hours (cooking on high gives you a crisp ring around the outside).

Read more...

Chicken and Summer Vegetable Tostadas with Mexican Rice

Thursday, January 22, 2009

This is a newbie for us. I was in the mood for something different for dinner one night this week, so I went perusing the internet for ideas.

I came across this recipe on Cooking Light, and since it sounded really good, I decided to go with it. I wanted to pair it with something else, so I then went on a hunt for a mexican rice recipe. I couldn't find exactly what I was looking for, so I used a couple different recipes as a foundation and added my own twists.

Both turned out awesome. Leftovers were fantastic, too.

Chicken and Summer Vegetable Tostadas
(Source: Cooking Light)

Ingredients:
- 1 teaspoon ground cumin
- 1/4 teaspoon salt
- 1/4 teaspoon black pepper
- 2 teaspoons canola oil
- 12 oz. boneless, skinless chicken breasts, cut into really small chunks
- 1 cup chopped red onion (about 1) (we used a mayan onion)
- 1 cup fresh corn kernels (about 2 ears) (due to the winter, we used canned corn)
- 1 cup chopped zucchini (about 4 ounces)
- 1/2 cup green salsa (we substituted regular red salsa)
- 3 tablespoons chopped fresh cilantro, divided (we used dried cilantro)
- 4 (8-inch) fat-free flour tortillas
- Cooking spray
- 1 cup (4 ounces) shredded Monterey Jack cheese (we used a pre-shredded "Mexican" mix)

Directions:
1. Preheat broiler.

2. Combine first 3 ingredients, stirring well. Heat oil in a large nonstick skillet over medium-high heat. Sprinkle the spice mixture evenly over chicken. Add chicken to pan; sauté for 3 minutes.

3. Add onion, corn, and zucchini to pan; sauté for 2 minutes or until chicken is done. Stir in salsa and 2 tablespoons cilantro. Cook 2 minutes or until liquid almost evaporates, stirring frequently.

4. Working with 2 tortillas at a time, arrange tortillas in a single layer on a baking sheet; lightly coat tortillas with cooking spray. Broil 3 minutes or until lightly browned. (Ours took much less than three minutes. Also, going from some suggestions in the comments section on Cooking Light, after they browned on the first side, we took them out of the oven, turned them over, sprayed with more cooking spray, and put them back under the broiler to brown the other side as well. This made the tostadas nice and crispy, and they held up well to the weight of the ingredients on top of them.)

5. Spoon about 3/4 cup chicken mixture in the center of each tortilla; sprinkle each serving with 1/4 cup cheese. Broil an additional 2 minutes or until cheese melts. Repeat procedure with remaining tortillas, chicken mixture, and cheese. Sprinkle each serving with about 3/4 teaspoon of remaining cilantro. Serve immediately.

Mexican Rice
(Source: Adapted from Southern Living)

Ingredients:
- 1 1/4 cups long-grain rice
- 1 tbsp. vegetable oil
- 1/4 - 1/2 cup chopped onion
- 2 garlic cloves, minced
- 1 (14 oz.) can chicken broth
- 1 (8 oz.) can tomato sauce
- 5 oz. water
- 1/2 tsp. salt
- 1/4 tsp. pepper
- 1/2 tbsp. chili powder
- 1 tsp. ground cumin
- 2 tsp. dried cilantro (optional)

Directions:
1. Saute rice in hot oil in a skillet over medium-high heat for three minutes or until lightly browned.

2. Add onion and garlic, and saute two minutes.

3. Stir in broth, tomato sauce, water, salt, pepper, chili powder, cumin, and cilantro. Cover, reduce heat, and cook until tender (about 15-25 minutes).

4. Remove from heat, and let stand 5 minutes. Fluff rice with fork.

Read more...

Cheese--I mean, Garlic--Fries

Sunday, January 11, 2009

OK, I must confess up front: These are not the kind of cheese fries you are likely expecting. In fact, it might be unfair to even call them cheese fries (but don't shoot the messenger!).

I'll admit that when I clicked through to the recipe on Cooking Light's website, I was a little bit disappointed, too. Because I would have given my left leg for a "light" version of real CHEESE FRIES. C'mon now.

Looking back, I should have known it was too good to be true.

Still, these sounded good and had great reviews, so we decided to go ahead and make them.

A bit time consuming? Well, cutting potatoes into thin strips can take a few minutes. Baking them for an hour eats up some time, too (obviously). But we planned ahead and they were worth the trouble. Overall, a good texture--I did overcook them a little bit--and great flavors. Really garlicky, and the parmesan added a punch. Yum.

For our fries, I used dried parsley because fresh herbs are always too expensive at my grocery store. And lord knows I'm not going to find them anywhere else around here at this time of year. I just used less of it since dried is always more potent than fresh. We also left the skins on the potatoes because, well, they're good that way.

OK, and now that I've gone back to Cooking Light to cite the recipe, I realize that I am a dirty, dirty liar. They aren't actually called cheese fries, but garlic fries. Whoops. I had done a search for cheese fries and these guys came up, so I guess in my mind, I wanted them to be cheese fries. *sigh* What an idiot. Don't mind me.

Just uh... yeah. Where was I going with this?

Garlic Fries
(Source: Cooking Light)

Ingredients:
4 tsp. canola oil
3/4 tsp. salt
3 lbs. peeled baking potatoes, cut into 1/4-inch-thick strips (we left skins on)
Cooking spray
2 tbsp. butter (used margarine)
8 garlic cloves, minced (about 5 teaspoons)
2 tbsp. finely chopped fresh parsley (we used 1 tbsp. dried parsley flakes)
2 tbsp. freshly grated Parmesan cheese

Directions:
1. Preheat oven to 400°.

2. Combine first 3 ingredients in a large zip-top plastic bag, tossing to coat. Arrange potatoes in a single layer on a baking sheet (we had to use two baking sheets) coated with cooking spray. Bake at 400° for 50 minutes or until potatoes are tender and golden brown, turning after 20 minutes.

3. Place butter and garlic in a large nonstick skillet, and cook over low heat 2 minutes, stirring constantly. Add potatoes, parsley, and Parmesan cheese to pan; toss to coat. Serve immediately.

I used less potatoes than the recipe called for, but we still ended up with way too many, even for two really hungry people. Next time, we will probably halve this recipe so we aren't tempted to eat so many.

Read more...

Butternut Squash Fries

Sunday, December 28, 2008

My brother's fiancee, Marie, bought me the Hungry Girl Cookbook for Christmas. Tonight, we decided to try the butternut squash fries with our sloppy joes.

I love a good ol' fashioned potato. Really, any way you cook and prepare it--baked, mashed, sliced, diced, french fried, au gratin, twice baked, peeled, with skin--whatever their form, potatoes are good eats in my book. So I was skeptical that these butternut squash fries could fill the shoes of my beloved potatoes.

But while these definitely don't take the place of french fries, they were good. I just don't think that the effort required to make them is something I'm going to be willing to do on a regular basis. They're actually not that difficult, but compared to a bag of oven fries picked up in the freezer section, they take a lot more time.

I do encourage you to give them a try, though. Especially if you're on a diet and are looking to fill a void. :) Because these babies? They are only 125 calories per serving. And a serving size is half of the entire batch! Hell, if you're REALLY hungry, and you REALLY like them, you could eat the entire batch for a "whopping" 250 calories. That right there is a calorie bargain.


Bake-Tastic Butternut Squash Fries
(Source: Hungry Girl by Lisa Lillien)

Ingredients:
- 1 medium butternut squash (about 2 pounds--large enough to yield 20 ounces of uncooked flesh)
- 1/8 tsp. kosher salt

Directions:
1. Preheat oven to 425 degrees.

2. Use a sharp knife to remove the ends of the squash. Cut squash in half widthwide (making it easier to manage), and then peel squash halves using a vegetable peeler or a knife. Cut squash in half lengthwise and then scoop out all seeds.

3. Next, cut squash into french fry shapes. Use a crinkle cutter to make authentic-looking crinkle-cut fries (they'll taste great any way you slice 'em, though). Using a paper towel, pat squash pieces firmly to absorb any excess moisture.

4. Place squash into a bowl, add a light mist of nonstick spray, and sprinkle with salt. Toss squash to evenly distribute salt and then transfer to a large baking pan sprayed with nonstick spray. Use 2 pans if needed. All squash pieces should lie flat in the pan.

5. Place pan(s) in the oven and bake for 40 minutes or so (longer for thick-cut fries, shorter for skinnier fries), flipping halfway through baking. Fries are done when they are starting to brown on the edges and get crispy.

MAKES 2 SERVINGS

Per Serving (1/2 of recipe): 125 calories, less than 0.5g fat, 158mg sodium, 33g carbs, 3g fiber, 6g sugars, 3g protein

Read more...

Crispy (Baked!) Homefries

Monday, October 20, 2008

I love potatoes. Any way you make them, I'm more than likely going to love them.

Last month, while we were in the Poconos, I made potatoes like I hadn't made them in a really long time. Cut up small, lots of spices, and baked until they are crispy. I was reminded of how good they are, so Michael and I vowed to make them again soon.

We had half a bag of potatoes left from the chowder we made a couple of weeks ago, so last night was the night for homemade homefries! We made turkey bacon BLTs, and had these on the side. The nice thing about this "recipe" is that it can be so easily adapted to accommodate individual tastes. There are so many different herbs and spices you can use on potatoes.


Crispy (Baked!) Homefries

Ingredients:
- 2-2.5 lbs. potatoes (We used Yukon Gold, but any variety will do. In the Poconos, we used red potatoes, which were equally as good.)
- Olive oil
- Garlic powder
- Garlic salt
- Black pepper
- Oregano
- Parsley

Directions:
1. Preheat oven to 450 degrees. Spray baking sheet with cooking spray.

2. Rinse potatoes and (if desired) peel. Cut potatoes into small chunks. Be sure to cut them all so they are relatively the same size.

3. In large bowl, combine potatoes with the rest of the ingredients. Drizzle liberally with olive oil. Add in garlic powder, garlic salt, black pepper, oregano, and parsley (to taste). With your hands, toss potatoes to coat them with herbs and spices.

4. Pour potatoes onto baking sheet and spread evenly.

5. Bake for 40-45 minutes or until crispy, flipping with spatula every 15-20 minutes. Baking time will vary depending on size of potatoes and individual oven. If potatoes do not become crispy on their own, throw them under the broiler for an additional 5 minutes after baking.

(The potatoes before going into the oven.)

Read more...

  © Blogger template On The Road by Ourblogtemplates.com 2009

Back to TOP