Showing posts with label recipes - dessert. Show all posts

Funfetti Blondies

Sunday, April 22, 2012

My cooking/baking had already become pathetic, but it was taken to a whole new level once we started the kitchen renovation. Now, we have a functional kitchen, but I have a very, very busy day job and we still have a to-do list a mile long for our house, so cooking and baking remains low on the list of priorities. Hence the VERY FEW recipes you've seen posted on this blog over the last several months.

But yesterday we were visiting family and I wanted to contribute to the food spread, so I looked for an easy dessert recipe that I could whip up last minute in the morning. That proved to be a little bit of a challenge in and of itself because I also very rarely read food blogs anymore, and I've kind of given up on Pinterest for the time being, so... I don't have much bookmarked. I happened to sign into my Google Reader and look at the starred items, and lo and behold, this recipe jumped out at me.

First of all, blondies = easy. Hooray! These came together really quickly (as you would expect), and they were a hit with the crowd. Delightfully chewy, and I absolutely love the addition of almond extract. The combination of white chocolate chips and sprinkles? Perfection. I had some Easter/spring sprinkles on hand that I wanted to use up, so my blondies were lovely pastels. :)

Whip up a batch of these for yourself and enjoy!

Funfetti Blondies
(Source: Beantown Baker)

Ingredients:
- 14 Tbsp butter, melted
- 1 1/2 cups brown sugar
- 1/2 cup sugar
- 2 eggs
- 1 tsp vanilla extract
- 1 tsp almond extract
- 2 cups flour
- 1/2 tsp salt
- 1/2 tsp baking powder
- 1 cup white chocolate chips
- 1/3 cup sprinkles

Directions:
1. Preheat oven to 350 degrees. Line an 9x13 pan with foil and lightly coat with cooking spray.

2. In a large microwave safe mixing bowl melt the butter. Allow to cool for 5 mintues.

3. Mix the sugars with the melted butter and beat until smooth. Beat in egg and then the extracts. Add salt, stir in flour and baking powder. Stir in white chocolate chips and sprinkles.

4. Pour into prepared pan and use a greased spatula to evenly spread mixture in pan and level the top. Bake for 24-28 minutes or until set in the middle. Cool on rack before cutting.

Read more...

Chewy Gingerbread Cookies

Tuesday, December 27, 2011

I've baked more in the past few weeks than I have in a really, really long time. So here I am, after Christmas, still with a recipe to post! I know it doesn't do anyone much good now--if you're anything like me, you're overloaded on sweets and the last thing you want to see is another cookie. But give it a few weeks, and maybe you'll be in the mood for a good gingerbread cookie again.

A chewy gingerbread cookie. These were actually my favorite new find this year.


One of the best parts was that I didn't even have to look for it. This cookie landed in my lap in the kitchen at work a few weeks ago and one bite into it, I was sold and e-mailing a coworker to share the recipe.

They're that perfect mix of spicy and sweet that only gingerbread can offer, and the soft, chewy center was what really won me over. I could take or leave crunchy gingersnaps, but these? These are too good to pass by.
Chewy Gingerbread Cookies
(Source: Unknown)

Ingredients:
- 2 1/4 cups flour
- 2 tsp. baking soda
- 1 tsp. ground ginger
- 1 tsp. cinnamon
- 1/2 tsp. ground cloves
- 1/4 tsp. salt
- 1 cup packed brown sugar
- 3/4 cup shortening
- 1/4 cup molasses
- 1 egg

Directions:
1. Stir together the first 6 ingredients.

2. In a separate bowl, combine the remaining ingredients and beat well with a hand mixer.

3. Add dry ingredients to the beaten mixture, beating well. Form small balls (about 1" or larger if you want bigger cookies) and roll in granulated sugar. Place 2 inches apart on ungreased cookie sheet.

4. Bake in a 375 degree oven about 10 minutes until tops of cookies begin to "crinkle"! Check at 8 minutes, and continue baking if necessary.

Read more...

Peanut Butter Reindeer Cookies

Saturday, December 24, 2011

To all those who celebrate, Merry Christmas Eve!

This morning, when I was in that brief state between sleep and awake, I actually thought it was Thanksgiving Day. That just goes to show how quickly Christmas sneaked up on me this year. But the gifts are wrapped, cookies are baked, and I need to throw this post up and then go get ready for Christmas Eve Mass before dropping by the in-laws and then dinner with my grandma, aunt, and uncle at my mom's. Wheeee!

These cookies are another gift from Pinterest. It's a basic peanut butter cookie turned into a reindeer. Gotta love Pinterest.

Mine didn't come out as adorable as the inspiration, but they're still cute, and hey, they taste delicious, so that's all that really matters. I think our nephews will get a kick out of them when we celebrate with Michael's side of the family tomorrow afternoon/evening.

What I like about these cookies is that they are "decorated," but wayyy easier than the traditional cookie cutouts. Although I'd love to put together some beautifully frosted cutouts, I just didn't have the time again this year--and these little guys came together from dough to finish in just an hour or two. So if you're looking for something to make last-minute as you prepare for Santa's arrival tonight, whip up a batch of these. But hurry and get to the store, you're running out of time! :)

Peanut Butter Reindeer Cookies
(Source: Bakergirl)

Ingredients:
- 3/4 cup peanut butter
- 1 1/4 cup firmly packed brown sugar
- 1/2 cup shortening
- 3 tablespoons milk
- 1 tablespoon vanilla
- 1 egg
- 1 3/4 cup all-purpose flour
- 3/4 teaspoon baking soda
- 3/4 teaspoon salt
- Chocolate-covered mini pretzels
- Mini brown M&Ms
- Regular-sized red M&Ms (we used peanut M&Ms)

Directions:
1. Preheat oven to 375 degrees.

2. Combine brown sugar, peanut butter, shortening, milk, and vanilla in large bowl. Beat at medium speed until well blended. Add egg; beat until just blended.

3. In a separate bowl, combine flour, baking soda, and salt. Add to creamed mixture at low speed. Mix just until blended.

4. Form dough into 1- to 1.5-inch balls. To make reindeer-shaped cookies, pinch the bottom of the ball slightly to form a point, then gently flatten with your hand. Space cookies about 2 inches apart on a greased cookie sheet and bake for 7 to 8 minutes, until set or just beginning to brown.

5. Remove from oven and immediately (and gently) press two mini pretzels into the tops of the cookies for the reindeer's antlers. Press two mini brown M&Ms in for the eyes and one red M&M for the nose.

6. Allow to cool 2 minutes on the baking sheet and then transfer to a wire rack or paper towel to cool completely.

Read more...

Oreo Stuffed Chocolate Chip Cookies

Saturday, April 23, 2011

The name says it all, don't you think?

But pictures still help...


...it's a chocolate chip cookie with an Oreo inside. Hello, gorgeous.

My cousin posted a link to these on her Facebook page a few months ago and I bookmarked them right away. Because I love Oreos. And I love chocolate chip cookies. For me, it was impossible for these to go wrong.

They are pretty simple to make, too. Mix up a basic chocolate chip cookie recipe, then smoosh the dough around the Oreo. Not too time-consuming. Check out Picky Palate for the recipe and nice step-by-step photos.

The verdict? These are super fun to eat. They are gigantic. See?

But I do have to admit that the taste of the Oreo gets overshadowed a bit. If I didn't know it was in the middle, I might not be able to guess. If you're looking for something fun and kind of impressive looking, though--these are your answer.

Also, if you want to try out some of the variations on the original (like a Nutter-Butter stuffed chocolate cookie), check out Serious Eats.

Go ahead and stuff yourself with cookie-stuffed cookies. I dare ya.

Read more...

Oreo Ice Cream Cake

Saturday, March 19, 2011

I first discovered this Oreo ice cream cake when Michael and I were still in college. I made it for him for his birthday during the first year we were together. Since then, I've made it at least another time or two, which is not nearly enough times, frankly.

I was feeling the need to dig this one out of the archives, so I made it to take over to my in-laws' this weekend.


A layer of crushed Oreos on the bottom makes the "crust," and a layer of ice cream (in this case, vanilla, but it could easily be jazzed up with a fancier flavor, if you so choose) gives this cold treat its name. Duh. A thin layer of chocolate syrup (could also be substituted by caramel sauce or butterscotch... holy hell that sounds good) separates the ice cream from the Cool Whip, which serves as the topping. Sprinkle some additional crushed Oreos at the finish, and you have yourself an easy, delicious dessert.

Once in the freezer, this has the tendency to disappear VERY quickly. You've been warned.

I have no idea where I originally got the recipe, as it was about 8 years ago. But here is a similar one.

Oreo Ice Cream Cake
(Source: Unknown)

Ingredients:
- 2 (8 oz.) containers Cool Whip, softened
- 1 (1/2 gallon) container of vanilla ice cream, softened
- Chocolate syrup
- 1 package Oreo cookies
- 2 tbsp. melted butter

Directions:
1. Crush Oreos. (You can crush them in a bowl or zip-loc bag using your hands or something heavy, or run them through your food processor.) Reserve 1/2 cup Oreo crumbles, and set aside for later. In the bowl of crushed Oreos, add melted butter and mix.

2. Spread Oreo and butter mixture into the bottom of a 9 x 13" pan, pressing firmly to form a crust.

3. Spoon vanilla ice cream on top of Oreo crust, spreading evenly.

4. Drizzle a thin layer of chocolate syrup on top of the ice cream.

5. Spread Cool Whip on top of the cake. Top with reserved Oreo crumbles.

6. Freeze overnight for best results. Remove from the freezer about 10-15 minutes prior to serving.

Read more...

Chewy Oatmeal Chocolate Chip Cookies

Saturday, January 29, 2011

Lately, I'm on an oatmeal kick.

The thing is, I don't even like oatmeal--at least not in its "natural" form. You won't catch me eating it as a bowl full of mush. Gross.

Put it in some baked goods, however, and I love oatmeal.

I'm on a search for awesome dessert recipes that contain--you guessed it--oatmeal. For a trip over to a friend's house, I started with Allrecipes.com, and turned up this recipe for chewy oatmeal chocolate chip cookies.


I spiced them up at bit by using a mixture of semisweet chocolate chips and milk chocolate/peanut butter chips, since that is what I had on hand. You could change these up by using a variety of different mix-ins--white chocolate chips, butterscotch chips, cinnamon chips, raisins, craisins, toffee bits, walnuts, etc. Go crazy!

These turned out lovely--they reminded me of a tasty cookie you'd pick up in a little cafe somewhere. And they were really easy to throw together, too, which always helps make a recipe a winner in my book!

Chewy Oatmeal Chocolate Chip Cookies
(Source: Adapted from Allrecipes.com)

Ingredients:
- 1 cup butter, softened
- 1 cup packed light brown sugar
- 1/2 cup white sugar
- 2 eggs
- 2 teaspoons vanilla extract
- 1 3/4 cups all-purpose flour
- 1 teaspoon baking soda
- 1/2 teaspoon salt
- 3 cups quick-cooking oats
- 1 cup chopped walnuts (optional; I omitted)
- 1 cup semisweet chocolate chips (or any other mix-in you'd like)

Directions:
1. Preheat the oven to 325 degrees F (165 degrees C).

2. In a large bowl, cream together the butter, brown sugar, and white sugar until smooth. Beat in eggs one at a time, then stir in vanilla. Combine the flour, baking soda, and salt; stir into the creamed mixture until just blended. Mix in the quick oats, walnuts, and chocolate chips. Drop by heaping spoonfuls onto ungreased baking sheets.

3. Bake for 12 minutes in the preheated oven. Allow cookies to cool on baking sheet for 5 minutes before transferring to a wire rack to cool completely.

Read more...

Salted Double Chocolate Chip Cookies

Friday, January 21, 2011

Baking is somewhat of a challenge these days. And when I do have an opportunity, I can't pick any ol' recipe that I've had my eyes on--I need to consider time and effort as well. After all, I have an adorable little 4-month-old daughter who is my first priority on the weekends!

But lord knows I do enjoy a good homemade treat from time to time (as does Michael), so we make it work every few weeks or so. Last weekend, we had plans to go to my mom's for dinner on Sunday, so I wanted to make some cookies for dessert.


Enter these salted double chocolate chip cookies. If you like salt, and if you like the combination between salty and sweet, this one's for you.

The original recipe calls for chocolate chunks mixed in the batter, but I was trying to simplify as much as possible so instead of chopping up semisweet chocolate, I used semisweet chocolate chips instead. As you can imagine, that change certainly didn't do any harm.

As Annie suggests, after the first day or so, these are better enjoyed after a quick zap in the microwave--I found 20-25 seconds worked best, but it will depend on your individual microwave, so be conservative to start. :)

Salted Double Chocolate Chip Cookies
(Source: slightly adapted from Annie's Eats)

Ingredients:

- 8 oz. semisweet chocolate, coarsely chopped
- 4 tbsp. unsalted butter
- 2/3 cup all-purpose flour
- 1/2 tsp. baking powder
- 3/4 tsp. fleur de sel (sea salt), plus more for sprinkling
- 2 large eggs, at room temperature
- 3/4 cup packed light brown sugar
- 1 tsp. vanilla extract
- 12 oz. semisweet chocolate chips

Directions:

1. Preheat the oven to 350˚ F. Line two baking sheets with parchment paper or silicone baking mats.

2. Combine the 8 ounces chopped chocolate and butter in a heatproof bowl set over a pan of simmering water, and heat until the chocolate and butter are melted and smooth, stirring occasionally. (Alternatively, heat in the microwave in 25-second intervals, stirring in between.) In another mixing bowl, stir together the flour, baking powder and salt.

3. In the bowl of an electric mixer, combine the eggs, brown sugar and vanilla. Beat on medium-high speed until the sugar has completely dissolved, about 4-5 minutes. Reduce the speed to low and add the melted chocolate mixture, blending until incorporated. Add in the dry ingredients and mix just until combined. Fold in the chocolate chips with a spatula. Drop heaping tablespoons of dough onto the prepared baking sheets, about 2-3 inches apart.

4. Bake, rotating the baking sheets halfway through, until the cookies are just slightly soft in the center and crackly on top, about 10-12 minutes. Sprinkle lightly with additional salt and let cool on the baking sheets 10 minutes. Transfer to a wire rack to cool completely. Store in an airtight container.

Read more...

Caramel Crunch Bars

Saturday, January 8, 2011

On New Year's Day, we had a get-together with some of Michael's extended family to celebrate Christmas. Since I didn't work the day before, I had a little bit of extra time to throw together something new for dessert. I took the opportunity to peruse my Google Reader, but didn't come up with anything that I just *had* to make. Instead, I turned to my Baking Bible and flipped through the pages, looking for something that inspired me.

I found inspiration in these bars. YUM.


A bonus was that they are pretty easy to put together--which is kind of rare for Dorie.

The cookie layer is deliciously crumbly, and the chocolate layer adds decadence. Add in the Heath Bar toffee bits on top and HOLY MOLY these are good.

These are made in a 13x9 pan, and you'll be surprised when you spread the batter out, because these puppies are really thin. You'll be even more surprised when Dorie suggests cutting these into 54 bars. (Um, hello--what 13x9 recipe results in *54* bars? It's more like 20, ha!) BUT, the thing is, these are pretty rich, and almost like a candy bar in a way, so in this case, smaller pieces really are more appropriate.

Caramel Crunch Bars
(Source: Baking: From My Home to Yours by Dorie Greenspan)

Ingredients:
For the base:
- 1 1/2 cups all-purpose flour
- 1 tsp. instant espresso powder or finely ground instant coffee
- 1/2 tsp. salt
- 1/4 tsp. ground cinnamon
- 2 sticks (8 oz.) unsalted butter, at room temperature
- 1/2 cup light brown sugar
- 1/4 cup sugar
- 1 tsp. pure vanilla extract
- 3 oz. bittersweet or premium milk chocolate, finely chopped

For the topping:
- 6 oz. bittersweet or premium milk chocolate, finely chopped
- 3/4 cup Heath toffee bits

Getting Ready: Center a rack in the oven and preheat the oven to 375 degrees F. Lightly butter a 9x13 inch baking pan, line the pan with foil and butter the foil. Put the pan on a baking sheet.

To make the base: Whisk together the flour, coffee, salt and cinnamon.

Working with a stand mixer, preferably fitted with a paddle attachment, or a hand mixer in a large bowl, beat the butter at medium speed until smooth, about 3 minutes. Add the sugars and beat for another three minutes or until the mixture is light and creamy. Beat in the vanilla and turn off the mixer. Add all the dry ingredients, cover the stand mixer with a kitchen towel (so you and your kitchen don’t get showered in flour) and pulse the mixer on and off at low speed about 5 times- at which point a peek at the bowl should reveal that it’s safe to turn the mixer to low and mix, uncovered, just until the dry ingredients are almost incorporated. Add the chopped chocolate and mix only until the dry ingredients disappear. If the chocolate isn’t evenly mixed, finish the job by hand with a spatula. You’ll have a very heavy, very sticky dough. Scrape the dough into the buttered pan and, with the spatula and your fingertips, cajole it into a thin, even layer.

Bake for 20 to 22 minutes, or until the base is bubbly – so bubbly that you can almost hear it percolating – and puckery. It will look as though it is struggling to pull away from the side of the pan. Transfer the pan to a rack and turn off the oven.

To make the topping: Scatter the chocolate evenly over the top of the hot base and pop the pan back into the oven for 2 to 3 minutes, until the chocolate is soft.. Remove from oven and immediately spread chocolate over bars, using offset spatula or the back of a spoon. Sprinkle the toffee bits over the chocolate and press them down lightly with your fingertips. Place the baking pan on a rack to cool to room temperature.

If, by the time the bars are cool, the chocolate has not set, refrigerate them briefly to firm the chocolate.

Carefully lift out of the pan, using foil edges as handles, and transfer to a cutting board. Trim the edges if they seem a bit thick. Cut about 54 bars, each about 2 inches by 1 inch, taking care not to cut through the foil.

Read more...

Pumpkin Oatmeal Cookies

Monday, December 13, 2010

I'll preface this by saying that until December 21, it is still technically fall. So, you know... pumpkin treats are still totally appropriate. And if I'm being totally honest, I wouldn't think twice about making pumpkin treats at any time of year. Because, c'mon! It's pumpkin!

I've been wanting to make some kind of oatmeal cookies for a while, so when I saw this recipe for pumpkin oatmeal cookies on Annie's Eats, it was just the thing to push me over the edge.


There are a bunch of ingredients, but most are just spices, so this dough comes together easily. I threw these together on Saturday afternoon and the only hard part about it was trying to keep them from making their way into my mouth as they came out of the oven.

I skipped the dried cranberries, and almost skipped the white chocolate chips, too (when it comes to pumpkin stuff, I'm kind of a purist), but oh my gosh, I'm so glad I didn't skip the white chocolate chips. They are the perfect mix-in for this cookie.

The finished cookies are chewy and spicy. Good for dessert, or, you know, for breakfast (not that I would know anything about that). After we enjoyed our share of these over the weekend, I brought the remainder of the batch into work this morning, at which point they were devoured by my coworkers in no time.

Hurry up and make these before fall is officially over! :)

Pumpkin Oatmeal Cookies

(Source: Annie's Eats)

Ingredients:
- 2 cups all-purpose flour
- 1 tsp. baking soda
- 2 tsp. ground cinnamon
- 3/4 tsp. ground ginger
- 1/4 tsp. ground cloves
- 1/4 tsp. grated nutmeg
- Dash of allspice
- 1/2 tsp. salt
- 1 cup (2 sticks) unsalted butter, at room temperature
- 1 cup light brown sugar, packed
- 1 cup granulated sugar
- 1 large egg
- 1 tsp. vanilla extract
- 1 cup pumpkin puree
- 1 & 1/2 cups old-fashioned oats
- 1 cup white chocolate chips (optional)
- 1 cup dried cranberries (optional) - I omitted

Directions:
1. Preheat the oven to 350 degrees. Line baking sheets with silicone baking mats or parchment paper.

2. In a medium bowl, combine the flour, baking soda, spices and salt. Whisk to blend.

3. In the bowl of an electric mixer, beat together the butter and sugars on medium-high speed until light and fluffy, about 3 minutes. Blend in the egg and vanilla. Beat in the pumpkin puree until well incorporated.

4. With the mixer on low speed, mix in the dry ingredients just until incorporated. Beat in the oats until combined.

5. With a rubber spatula, fold in the white chocolate chips and dried cranberries until evenly mixed.

6. Drop in small scoops (about 2 tablespoons) onto prepared baking sheets, spaced 2-3 inches apart. Bake 12-14 minutes, or until the cookies are lightly browned, rotating the sheets halfway through baking.

7. Allow to cool on the sheets about 5 minutes, then transfer to a wire rack to cool completely. Store in an airtight container.

Makes about 36 cookies

Read more...

Caramel Apple Pie

Saturday, November 27, 2010

A few weeks back, we went to visit some of Michael's family that lives about an hour away from us. While there, we were served slices of apple pie--but not just any apple pie--caramel apple pie. After indulging in that slice of heaven, I decided that for Thanksgiving this year, I would put a twist on my traditional apple pie and find a recipe that included caramel. Once again, Google to the rescue.


I made and baked the pie the night before Thanksgiving, then warmed it up in the oven prior to serving on Turkey Day. And oh my... it was awesome. Loaded with apples and creamy caramel, this is exactly what every apple pie should be. As it turns out, the leftovers are really good cold as well (not that I would know anything about that).

Caramel Apple Pie
(Source: Adapted from Allrecipes.com)

Ingredients:

For taffy:
- 1/2 cup packed brown sugar
- 1/4 cup butter, melted
- 1/3 cup all-purpose flour

For pie filling:
- 5-6 cups thinly sliced apples
- 1/4 cup white sugar
- 6 tbsp. all-purpose flour
- 4 tsp. ground cinnamon
- 1 tsp. lemon juice
- approximately 1 cup caramel dip (We find this by the apples in our produce section. You can also use caramel ice cream topping)

For crust:
- 1 recipe your favorite recipe for a 9-inch double crust deep dish pie (ummm, I may or may not cheat and buy store-bought refrigerated crust. *wink*)
- 2 tbsp. milk

Directions:
1. Preheat oven to 375 degrees.

2. To Make Taffy: In a small bowl combine brown sugar, melted butter or margarine, and flour. Mix well and set aside.

3.
To Make Apple Filling: Place apples in a large bowl. Add white sugar, flour, cinnamon, and lemon juice. Toss until all ingredients are mixed well and apples are thoroughly coated.

4. Spoon half of apple filling into pastry-lined deep-dish pan. Spread caramel on top of apple filling (I just did a generous coating--not too much), then top with half of taffy mixture. Repeat process with remaining apple filling, more caramel, and remaining taffy mixture.

5. Place top pastry over filling and seal well (this is very important--if edges are not sealed, caramel will leak out all over). Cut steam vents and brush top crust with milk or light cream.

6.
Cover pie with foil and place on a baking sheet. Bake in preheated oven for 25 minutes. Remove foil from pie and bake for another 20 to 30 minutes, until crust is golden. Serve warm.

Read more...

Blueberry & Strawberry Hand Pies

Thursday, July 8, 2010

Pies.

Mini pies.
Pies that fit into the palm of your hand.
And can be eaten with your fingers.
http://farm5.static.flickr.com/4139/4772586023_7cfed8fcdc_o.jpg
Need I say more than that? I mean, really.

I've seen a few different versions of these pop up on food blogs that I frequent, but when I saw them appear on Beantown Baker last week, I decided that I simply *must* make them while strawberries are still in season. And then, I thought--why just stick to strawberry? I shall make half of them blueberry instead.
And so I have a boatload (OK, not really--the dough recipe made exactly 20 for me, just like it says) of itty bitty strawberry AND blueberry pies waiting to be carted off to the Poconos with us this weekend. Wheeee!

As you'd probably expect, these are a bit on the time-consuming side. At first, I kind of panicked about how long it took me to make just two hand pies, but after that, I fell into the swing of things and my technique got better, so it wasn't as bad as I thought it might be. And they're cute, aren't they? Totally worth a little extra effort.
One thing you should know is that these aren't as sweet as you'd maybe think--even though they are sprinkled with extra sugar on the outside. I find that the fruit filling is actually a bit tart! (Scrumptious, of course... but tart.) I saw on Delicious Meliscious that she actually brushed the outsides of her hand pies with a sweet glaze. I might try that next time for a little additional sweetness.

I can't wait to try these with apples in the fall.

Note: I made half of the strawberry filling from Beantown Baker, and half of the blueberry filling from Delicious Meliscious, and only one recipe of the pastry dough. These are the measurements and amounts I've included below. However, if you'd like to stick with one flavor or the other (strawberry OR blueberry, but not both), make sure you double the filling recipe back up so you'll have enough to go around.

Blueberry & Strawberry Hand Pies

Ingredients:
For the pastry dough:
- 9 1/2 ounces all-purpose flour, approximately 2 cups
- 2 tsp. baking powder
- 3/4 tsp. kosher salt
- 2 1/2 ounces shortening, approximately 6 tablespoons
- 3/4 cup milk
- 1 egg mixed with 1 to 2 teaspoons water

For the strawberry filling:
- 1 pound of strawberries (~2 cups, hulled and chopped into small pieces)
- 2 tbsp. flour
- 2 tbsp. sugar
- Pinch of salt
- 1/4 tsp. vanilla extract

For the blueberry filling:
- 1 cup blueberries, fresh or frozen (thawed)
- 1/4 cup sugar
- 2 1/4 tsp. cornstarch
- 1/4 tsp. cinnamon

Directions:
1. To make strawberry filling, mix all ingredients together and set aside.

2. To make blueberry filling, mix all ingredients together and set aside.

3. In the bowl of a food processor, combine the flour, baking powder and salt. Pulse for a few seconds and then pour into a large mixing bowl. (Since my food processor parts were dirty and in the dishwasher already, I skipped that part and simply whisked the dry ingredients in the large mixing bowl. Funny that I didn't notice any ill effects from doing so--surprise, surprise! I think Alton Brown makes things more complicated than they need to be.)

4. Add the shortening and knead it into the flour with your hands until it is crumbly.

5. Add the milk all at once and mix in with a spatula until it begins to come together.

6. Lightly flour your hands and the countertop and turn the dough out onto the countertop. Knead the dough ball, folding over 10 to 20 times.

7. Using a rolling pin roll the dough to 1/3 to 1/2-inch thickness, then cut into rounds using a 2 1/4-inch ring. Roll each round as thinly as possible or to 5 to 6 inches in diameter. (This might take a little practice to get right--but the dough should be REALLY thin, just one step above tearing apart.)

8. Spoon 1 to 2 tablespoons of filling onto the dough, brush the edges of half of the dough lightly with the egg wash, fold over and seal the edges together with the tines of a fork, dipping it into flour as needed. Gently press down to flatten and evenly distribute the filling and snip or cut 3 slits in the top of the pie.

9. Brush a little bit of egg wash on the outside of the pie and sprinkle with decorating sugar.

10. To bake pies, preheat the oven to 350 degrees F. Place finished pies onto an ungreased cookie sheet and bake for 25 to 30 minutes or until golden brown.

Read more...

The Best Chocolate Bundt Cake

Tuesday, July 6, 2010

Give me the choice between chocolate and vanilla cake, and I'll choose vanilla. Always. It's not that I don't like chocolate cake. Because, c'mon... it's cake. I don't discriminate. But still... vanilla always wins me over.

Thankfully, there are people in my life who do prefer chocolate cake, so I still get to enjoy it every once in a while!

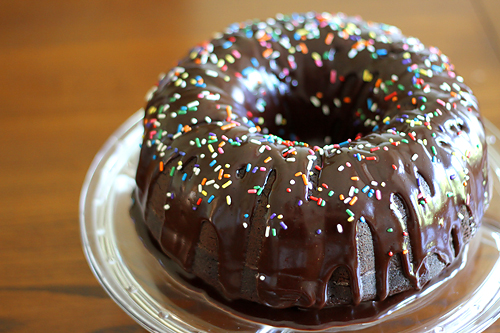
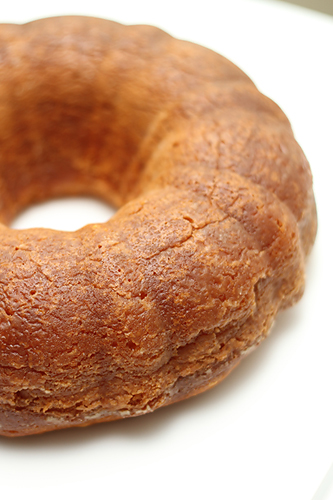
I bookmarked this bundt cake recipe several weeks ago, and was just waiting for someone to "make me" make it. That someone? It turned out to be my mom. It was her birthday last week, and we got together as a family yesterday to celebrate. All of the other dessert recipes I had my eye on contained strawberries--which, for some CRAZY reason, my mom doesn't like. And so, that left this bundt cake. This lovely, chocolate bundt cake. Yum.


A perfectly moist, fluffy, chocolatey bundt cake, covered with a delightfully creamy and slightly tangy chocolate glaze. Um, HELLO!

We hate coffee in this household, so I didn't use it in the recipe. I used water instead. It's not that I think the coffee flavors would've really come through (I hear that all it does is enhance the chocolate flavors); it's just that we do not own a coffee maker, or coffee of any sort, and I certainly wasn't going to willingly buy any. I don't think the cake suffered from the lack of coffee at all, so take that for what it's worth.

The only other change I made was to make only half of the glaze. I read in the comments on Joy's post that everyone thought the recipe made way too much glaze, and to avoid having so much extra, I decided to cut the recipe in half. Good thing, too, because even that made a lot of glaze--I had a bit left over, even after generously dousing my cake. Speaking of dousing the cake... the one thing I wished I had done was to line the outside edges of the cake bottom with wax paper prior to pouring the glaze. I ended up having big globs of glaze all along the bottom that I needed to wipe up in order to put the lid on my cake plate. So, lesson learned.

I finished everything off with a handful of rainbow sprinkles to make it festive for my momma's birthday. Nothing left to do but eat and enjoy.

The Best Chocolate Bundt Cake with Chocolate Glaze
(Source: Adapted from The Big Sur Bakery Cookbook, as seen on Joy the Baker)

Ingredients:
For the cake:
- 1 1/4 cups plus 1 Tablespoon brewed coffee (or hot water)
- 3/4 cup Dutch process cocoa powder
- 2 1/4 cups sugar
- 1 1/4 teaspoons kosher salt
- 2 1/2 teaspoons baking soda
- 2 whole eggs
- 1 egg yolk
- 1 1/4 cups plus 1 Tablespoon buttermilk
- 1 cup plus 2 Tablespoon canola oil
- 1 1/2 teaspoons vanilla extract
- 2 1/2 cups, plus 2 Tablespoons all-purpose flour, sifted

For the glaze:
- 3 ounces unsweetened chocolate
- 3/4 stick (6 tbsp.) unsalted butter
- 1 1/2 cups powdered sugar
- 1/4 cup sour cream, at room temperature
- 1/8 cup brewed coffee, cooled (or water)

Directions:
1. Place an oven rack in the center of the oven and preheat to 350 degrees F.

2. Grease and flour a 10-inch Bundt pan and set aside.

3. To make the cake batter: Put brewed coffee (or hot water) and cocoa powder in a small saucepan and bring to a boil, whisking frequently. Remove from the heat and let come to room temperature.

4. In the bowl of a stand mixer fit with a whisk attachment, mix together sugar, salt, baking soda, eggs and egg yolk on low speed for about 1 minute. Add the buttermilk, oil and vanilla extract and mix on low again for another minute.

5. Add the flour and mix on medium speed for 2 minutes. Add the cooled cocoa mixture and mix on medium speed for 3 minutes. The batter will be very loose. Pour into the prepared cake pan and bake for 1 hour, or until a cake tester inserted in the cake comes out clean.

6. Let the cake cool completely in the pan and then invert onto a cooling rack.

7. To make the icing: Chop the chocolate into small pieces, put them in a heatproof bowl (or a double boiler), and set the bowl over a pot of barely simmering water. Be sure that the bottom of the bowl does not touch the boiling water. Remove the bowl from the heat when all of the chocolate bits have melted.

8. Melt the butter in a separate pan or in the microwave. Whisk the melted butter into the melted chocolate until thoroughly incorporated. Sift in half of the powdered sugar. Add the sour cream and whisk to combine. Sift in the remaining powdered sugar and whisk until smooth. The glaze should be thick and shiny. Lastly, add the coffee and whisk to create a glossy glaze.

9. Pour the glaze over the Bundt cake, covering it completely. Leave at room temperature until ready to serve.

Read more...

Strawberry Lemon Sorbet

Saturday, May 29, 2010

With the warm weather and the holiday weekend, I figured it was about time we break out the ice cream maker for the season. At first, I planned to make a strawberry sorbet I made last year and loved. But since we're going to my in-laws' for a BBQ tomorrow, and they love lemon, I decided to give a strawberry lemon sorbet a try. I've had this recipe marked since last summer, so it was about time!

The flavor is a striking balance between sweet and tart, and it's really refreshing. My only (minor) complaint about it is the consistency--because you puree an ENTIRE lemon as one of the ingredients, the resulting sorbet is a teensy bit pulpy. As someone who cannot stand pulp in orange juice, it's a little off-putting for me. Still, it's not enough to keep me from eating it! I would just prefer a smoother consistency.

Strawberries are in season and on sale these days, so it's a perfect time to buy a ton of strawberries! We've been going through at least a couple of pounds a week. I love summer fruit!

Strawberry Lemon Sorbet
(Source: The Way the Cookie Crumbles)

Ingredients:
- 1 lemon, seeded and roughly chopped
- 2 cups sugar
- 2 pounds strawberries, hulled
- Juice of 1 to 2 lemons
- 2 tsp. rum or vodka (to prevent it from freezing too solid!)

Directions:
1. Place the chopped lemon and sugar in a food processor, and pulse until combined. Transfer to a bowl.

2. Puree the strawberries in a food processor, and add to the lemon mixture, along with the juice of 1 lemon. Taste and add more juice as desired. The lemon flavor should be intense but should not overpower the strawberries. Pour the mixture into an ice cream machine and churn until frozen.

Read more...

Mini Chocolate Chip Cookie Dough Brownie Cupcakes

Friday, May 14, 2010

It only takes one look at the recipe to conclude that these are not exactly "light" in the dessert category. Using a total of four sticks of butter, these are just about the least diet-friendly treat you can make. The one thing they've got going for them? They're small, and since they're "cupcakes," you have built-in portion control.

Oh, and they're delicious. That should be obvious, right? Brownie + cookie dough is just about as good as it gets.


Bonus: After frosting all of the brownies, I had a decent amount of leftover egg-less cookie dough. And who would ever complain about having THAT in the fridge? A spoonful here, a spoonful there... awesome.

This recipe makes quite a few mini cupcakes. And mine were bigger than traditional "minis"--I bought the mini Reynolds foil liners that are much smaller than a cupcake, but don't fit in a mini-cupcake pan. For me, this made approximately 40 mini cupcakes. I'm bringing a bunch with me to my sister-in-law's tomorrow, then the rest are coming with me to work on Monday!

Mini Chocolate Chip Cookie Dough Brownie Cupcakes
(Source: Beantown Baker)

Ingredients:
- 1 cup (2 sticks) unsalted butter
- 2 1/4 cups sugar
- 4 large eggs
- 1 1/4 cups cocoa
- 1 tsp. salt
- 1 tsp. baking powder
- 1 tbsp. vanilla extract
- 1 1/2 cups all-purpose flour
- 1-2 cups mini chocolate chips

Cookie Dough Frosting:
- 2 sticks butter, softened
- 1 cup brown sugar
- 1/2 cup sugar
- 1/2 cup milk
- 2 cups flour
- 1 1/3 cups mini chocolate chips

Directions:
1. Preheat the oven to 350°F. Place mini cupcake liners in pan.

2. In a saucepan set over low heat, melt the butter, then add the sugar and stir to combine. Return the mixture to the heat briefly, just until it's hot, but not bubbling; it'll become shiny looking as you stir it. Heating this mixture a second time will dissolve more of the sugar, which will yield a shiny top crust on your brownies.

3. Transfer the sugar mixture to a medium-sized mixing bowl, if you've heated it in a saucepan. Stir in the cocoa, salt, baking powder, espresso powder, and vanilla.

4. Whisk in the eggs, stirring until smooth.

5. Add the flour and chips, again stirring until smooth.

6. Spoon the batter into mini cupcake pan.

7. Bake the brownies for about 8-10 minutes, until a cake tester inserted into the center comes out clean, or with just a few moist crumbs clinging to it. The brownies should feel set on the edges, and the center should look very moist, but not uncooked.

8. Remove them from the oven and cool completely on a rack.

For cookie dough frosting:
Cream the butter and sugars until light and fluffy. Beat in milk. With mixer on low, add flour and mix until well combined. Stir in mini chocolate chips.

To assemble:
Pipe or spread the cookie dough frosting onto the cooled mini cupcakes. Chill the brownies until the cookie dough is firm. Serve at room temperature.

Read more...

Snickers Pie

Friday, May 7, 2010

For all of you who curse me on a regular basis because of all of the yummy and (sometimes) not-so-healthy recipes I post... this one is for you.

Because y'all, I have good news. Snickers Pie?... is a Weight Watchers recipe.

Awwww yeeaaah.


I came across this gem way back in 2006, during my Weight Watchers days. I made it a few times and it was always well-received because it's pretty scrumptious for being relatively "good" for you. A few years back, I whipped it up for Mother's Day, when we hosted both of our mothers over at our house for dinner.

Well, my mother-in-law hasn't stopped talking about it since. :) Unfortunately for her, I don't repeat recipes very often (especially not dessert ones!) because there are always so many that I want to try, and have limited opportunities to do so. But when we made plans to go to my in-laws' for dinner tomorrow night to celebrate Mother's Day, I knew I just HAD to finally give into her requests to make this again. She's going to be sooo happy.

This is amazingly easy to whip up. It can be made in advance, but you can always throw it together last minute should you need a dessert in a pinch.

Somehow, frozen yogurt + pudding mix + cool whip + peanut butter + Grape Nuts cereal, of all things = something that tastes strikingly similar to a frozen Snickers bar. Don't ask me how or why... just call it a foodie miracle. Then go and make some for yourself.

Snickers Pie
(Source: Hungry Girl)

Ingredients:
- 1 1/2 cups vanilla frozen yogurt, softened
- 1 cup fat-free whipped topping (like Cool Whip)
- 1 small box fat-free, sugar-free instant chocolate pudding mix
- 1/4 cup reduced fat peanut butter (chunky)
- 3 oz. Grape Nuts cereal
- Hershey's Lite Chocolate Syrup, for drizzling

Directions:
1. Microwave peanut butter for 20-30 seconds to soften it enough to stir easily.

2. Combine all ingredients (except chocolate syrup), and mix together well. Pour into 8" dish. Freeze for 20-30 minutes.

3. Drizzle with chocolate syrup. Jazz it up with a few extra dollops of whipped topping, and sprinkle with mini chocolate chips, sprinkles, etc.

4. Freeze until ready to serve. Remove from freezer 5-10 minutes before serving.

Read more...

M&M Pretzel Treats

Friday, April 16, 2010

Eighteen weeks into pregnancy, I don't so much believe in "cravings" as I do in seeing or hearing about something and just, well, not being able to get it out of your head. I haven't really had overwhelming urges to have something right now, but if I get an idea for something that sounds good, I have to make it or buy it soon.

Hmmm. Doesn't really sound like much of a difference now, does it?

Um, OK, yeah... so maybe I do believe in cravings.

My sister-in-law sometimes makes these during the Christmas season, so when I saw these M&M pretzel treats on Beantown Baker and my taste buds' memory was jogged, it was the end of the story. I had to buy the ingredients and make them. (Perhaps I should stay away from food blogs?)

Pretzels + chocolate + M&Ms = dynamite. See?


The version I'm accustomed to is a bit different than Jen's. Simply, it's less melted chocolate and fewer M&Ms. This chocolate-to-pretzel ratio is perfect for me, but the route you choose to go depends solely on your taste. Check out Jen's version if you think you'd like more chocolate.

These are super simple to throw together and are sure to be a hit at any party or get-together. They're also awesome to have on hand to have a few for dessert or a snack, but I warn you... they won't be on hand for long. They are addicting and hard to resist!

M&M Pretzel Treats

Ingredients:
You'll need plain M&Ms, mini pretzels, and candy melts (I use the milk chocolate and white chocolate varieties that are sold in bulk at my grocery store). The amount of ingredients depends on how many of these puppies you want to make.

Directions:
Spread out a sheet of wax paper on the counter or table. Spread pretzels on the wax paper so that they lie flat. Melt candy melts according to package directions. Pour melted chocolate into squeeze bottles. (If you don't have squeeze bottles, you can use a spoon to drizzle chocolate onto pretzels.) Squeeze a dime-sized glob of chocolate on the middle of the pretzel. Press a plain M&M down into the chocolate. Allow finished treats to set (15-20 minutes or so), then store in an air-tight container.

Enjoy!

Read more...

Rum Cake

Monday, February 15, 2010

During the summers of my childhood, we would spend eight weeks living with my dad in Virginia. I have so many memories of summer days gone by--in my grandparents' pool, playing with my cousins at their house, running around in the sweltering heat, and trips to Virginia Beach.

Other things I remember have to do with special treats--sneaking cookies out of the jar in Mema's kitchen, going to the "Sugar Shack" for icee drinks, begging to go to Country Cookin' for dinner, and eating frozen Twinkies given to us by Grandaddy.

But one particular treat had been long forgotten, until recently. I got a bundt cake pan for Christmas, and suddenly, it hit me that I really wanted rum cake. The same rum cake that used to magically appear at my dad's house every once in a while, and was quickly devoured.

I called my dad and asked him if he had the recipe. I remember, in years past, seeing it hanging on his refrigerator. He said that he didn't have it anymore, but that it was Grandad who used to make it all the time. So I called up my sweet, southern grandparents and my Mema gave me her specific instructions over the phone.

Rum cake was to be had!


And as it turned out, it was to be had very easily. To my surprise, this is actually a doctored cake mix. Score! It came together extremely quickly and made a perfect birthday treat for the celebration of Michael's birthday this past weekend.

I have to admit, I was pretty surprised at how much it tastes like rum. The strongest rum taste definitely comes from the "glaze" portion of the recipe. From when I was a child, I don't remember the cake having quite that strong of a flavor to it. I figure that 1) I was too young to know what rum tasted like, so I was just oblivious to the flavor, or 2) my grandparents may have made the cakes without the glaze when they made them for us.

The glaze, which gets completely absorbed into the cake, helps make the cake extremely moist and delicious. However, for a more subtle flavor, I might try the cake without the glaze next time, just to see if it more closely resembles what I remember from all those years ago. I do encourage you to try it with the glaze, though--I think you'll find that this is unlike any cake you've ever had before! :) We gobbled up a good portion of the cake after dinner at my in-laws'.

Alright, enough talk.

Rum Cake
(Source: My Grandparents)

Ingredients:
For Cake:
- 1 box yellow cake mix
- 1 box vanilla instant pudding
- 1/2 cup water
- 1/2 cup rum
- 1/2 cup oil
- 3 large eggs (or 4 smaller ones)
- 1/2 cup chopped pecans (optional)

For Glaze:
- 1 stick butter or margarine
- 1 cup sugar
- 1/4 cup rum
- 1/4 cup water

Directions:
1. Preheat oven to 325 degrees. Grease and flour a bundt cake pan. (For greasing and flouring, I usually use nonstick spray and then lightly coat with flour. For this, I broke out the shortening because I didn't want to take any chances. Use butter or shortening to liberally grease all of the nooks and crannies in the pan, then flour well.)

2. In a large mixing bowl, combine cake mix, pudding mix, water, rum, oil, and eggs. Beat together for two minutes.

3. If using the chopped pecans, pour them into the bottom of the prepared bundt pan. Spread them evenly along the bottom of the pan.

4. Pour cake batter into pan, and spread evenly. Bake for 55-60 minutes.

5. During the last few minutes of baking, start your glaze. Melt the butter/margarine in a small saucepan over high heat. Once melted, add sugar, rum, and water. Stirring the mixture often, dissolve the sugar and bring everything to a boil. Boil for approximately 5-6 minutes.

6. Once cake comes out of the oven, leave it in the pan. While the cake is still warm/hot, poke holes into the cake (I used a skewer). Remove hot glaze from the stove and pour it evenly over the cake in the pan. You'll see the glaze collect in the sides of the pan.

7. Let glazed cake cool for 30 minutes. At this time, the glaze should be completely absorbed into the cake. Turn cake out onto serving dish. Keep covered until serving.

Read more...

Gingersnap Trifle

Monday, January 18, 2010

I love trifles. They are a perfect dessert option because 1) they are pretty, 2) they are tasty, and 3) they are easy. And really... what's not to love about that?

This particular trifle was "invented" by our friend, Greg, a couple of years ago. He served it to us at a SuperBowl party and I consequently stole the idea and have made it a few times since then. It doesn't get much more simple than this--pudding, cool whip, and gingersnap cookies.


Taking another cue from good ol' Greg, I make this even simpler by purchasing pre-made pudding. Yes, the kind in the little single-serve cups. (I know.) I buy them when they're on sale for $1 per 4-pack, and it's just so much easier than fiddling with making pudding. I don't even like to mess with the instant kind, because I always find that the consistency is a little lumpy looking so it's not as pretty! Take my word for it.

You can also make this dessert pretty light by using sugar free, fat free pudding, and fat free cool whip.

My favorite part is how the layers of gingersnaps in the middle get all soft and chewy. I'm not a big fan of gingersnaps in general but I love them in this trifle. Get thee a trifle bowl and make this... STAT!

Gingersnap Trifle

Ingredients:
- 6 cups vanilla pudding (or 12 single-serving cups)
- 4 cups caramel pudding (or 8 single-serving cups)
- 2 (8 oz.) containers of cool whip, softened
- 30-40 gingersnap cookies (depending on size)

Directions:
1. Spoon three cups of vanilla pudding into the bottom of the trifle bowl, and spread into an even layer.

2. Place a single layer of gingersnap cookies on top of the pudding.

3. Spread one container of cool whip in an even layer on top of the cookie layer.

4. Place another layer of gingersnap cookies on top of the cool whip.

5. Top cookie layer with all 4 cups of the caramel pudding and spread evenly.

6. Spread the other container of cool whip on top of the caramel pudding.

7. Place another layer of gingersnap cookies on top of the cool whip.

8. Spoon the remaining three cups of the vanilla pudding on top of everything and spread evenly.

9. Top with a final layer of gingersnap cookies for decoration.

Read more...

Caramel Cocoa Crispy Bars

Sunday, January 3, 2010

I have so many recipes to share from this week! It's going to take me a while to get caught up. I hope you guys are up for all of these food posts. :)

For New Year's Eve, we were going to a couple of different parties, and of course, we couldn't go to either one of them empty-handed. For my brother's party, I decided to make a dessert. I went through several starred recipes in my Google Reader, looking for something relatively easy, but wonderfully tasty. After putting my "finalists" up for votes from Michael and Cristina, we settled on these caramel cocoa crispy bars.


These "fancified" rice krispy treats flew off of the platter at the party. They're irresistible, and were a wonderful treat with which to welcome the new year. The cocoa krispies cereal is mixed with melted marshmallows and butter, pressed into a pan, drizzled with melted caramel candies, and topped with mini chocolate chips. Start your year off right--make these!

Caramel Cocoa Crispy Bars
(Source: Adapted from Annie's Eats)

Ingredients:
- 3 tbsp. butter
- 1 (10 oz.) package marshmallows
- 6 cups cocoa crispy cereal (brand name or generic, both work fine)
- 20-24 caramel candies, wrappers removed
- 1-2 tbsp. milk, half-and-half, or cream
- handful of mini chocolate chips

Directions:
1. Prepare a 9x13" pan by greasing with butter or nonstick spray.

2. Melt the butter in a large saucepan over medium heat. Add the marshmallows, stirring until completely melted. Remove from heat.

3. Working quickly, add the cereal and stir until it has been evenly coated with the melted marshmallow mixture. Pour the treats into the prepared 9x13" pan. Using a heavily-greased spatula (spray generously with nonstick spray), press the cereal mixture down into the pan evenly.

4. To make the caramel topping, place the candies into a heatproof bowl. Microwave in 15-second intervals, stirring in between, until completely melted. Before the last interval, add 1 tbsp. of the milk/cream, heat, and then stir to combine. If necessary, add another tbsp. of milk/cream to make the caramel easy to drizzle. Drizzle over the top of the cocoa crispy bars. Sprinkle the handful of mini chocolate chips immediately, and press down lightly to help them adhere to the caramel.

5. Allow the bars and the caramel topping to set completely. Cut into bars for serving.

Read more...

Slice and Bake Brown Sugar Cookies

Wednesday, December 23, 2009

I spent three hours making cookies today. Or, I should say... I spent three hours making the dough. The baking time is separate.

What? I've never told you I'm crazy?

Well, now you know.


But these are so ridiculously adorable and festive that I just couldn't resist. And perhaps it wouldn't take a normal person three hours to prepare these for baking. However, for me and my perfectionist tendencies, these involved rolling and re-rolling dough, measuring (yes, I busted out a ruler!), and cutting the dough along a straight edge with a pizza cutter.

Yes, I'm crazy indeed.

Let's just say that if cookies had a "difficulty rating," these would be labeled as "for advanced users only." If you aren't handy with a rolling pin, you should probably stay away. Well, stay away from making these cookies. I'm not saying you can't eat them. Anyone can do that. :)

The recipe from Bridget includes pretty detailed instructions on how to make each of the three designs pictured above (the stripes, checkerboard, and spiral cookies). The candy canes were my own doing, made from my dough scraps. I simply rolled out "snakes" of dough with my hands, and then twisted them together in the shape of candy canes. Cute, huh? They were the easiest ones!

These sugar cookies taste different from your typical cutouts, and that's because they're made with brown sugar. They're not too sweet--instead, they remind me a bit of a shortbread cookie. Bridget said that to her, they're essentially chocolate chip cookies without the chocolate. Either way, I think these are a winner. The recipe makes a lot of cookies, but they're small and pretty thin, so no need to halve the recipe!

All of these colorful designs look super impressive when put together on a platter, so if you do decide to take these on... you're sure to receive many comments on how pretty they are. And that's just a bonus. :)

Slice and Bake Brown Sugar Cookies
(Source: The Way the Cookie Crumbles)

Makes about 8 dozen

The only difficult part of this recipe is rolling out the dough to an exact size. The best method I found was to initially roll it out to about twice the desired size, then trim the edges to a shape 1 inch smaller in each direction than you eventually want. Place the trimmings on the cut rectangle, cover with wax paper, and roll out to your final desired size (see photos above).

Ingredients:
- 4 cups (19.2 ounces) unbleached flour
- 1 teaspoon baking powder
- 1/4 teaspoon baking soda
- 2 eggs, preferably room temperature
- 2 teaspoons vanilla extract
- 20 tablespoons (2 1/2 sticks) butter, room temperature
- 1 teaspoon salt
- 1 cup (7 ounces) firmly packed light brown sugar
- 1/2 cup (3 1/2 ounces) granulated sugar
- 1/2 ounce unsweetened chocolate, finely chopped (I omitted)

Directions:
1. In a medium-sized bowl, combine the flour, baking powder, and baking soda. Break the eggs into a small measuring cup, whisk them lightly, and mix in the vanilla.

2. Place the butter in the bowl of a stand mixer fitted with the paddle attachment (or a large mixing bowl if you’re using a hand-held mixer). Beat the butter on medium-low speed until it’s smooth, then add the salt and both sugars. Continue beating on medium-low until the mixture is light and fluffy, about 2 minutes, scraping the sides of the bowl as needed. With the mixer running, gradually add the egg mixture. Once the eggs have been added, scrape the sides of the bowl once, then continue mixing on medium speed for about 1 minute. Reduce the mixer speed to low and gradually add the flour mixture, mixing just until evenly combined. Divide the dough into three equal portions.

3. For the striped cookies: Divide the first portion of dough into three more equally sized parts. Color one third red, another green, and leave the last one white. Between sheets of wax paper, roll each portion out to a 3-by-9-inch rectangle. Freeze the rectangles for about 10 minutes, until they’re firm enough to cut and stack. Cut each rectangle in half lengthwise to form two 1½-by-9-inch rectangles. Stack the rectangles of dough, alternating colors, to form a block of dough with stripes. Trim the edges if desired. Wrap in wax paper and freeze for at least four hours, or up to 4 weeks.

4. For the checkerboard cookies: (For these, I chose not to use the chocolate. Instead, I just used brown food coloring (Wilton) to color half the dough. I've left the original instructions here in case you'd like to do the chocolate.) Place the chocolate in a microwave-safe bowl and microwave on half power for about 30 seconds. Stir, then repeat the heating and stirring until fully melted, being careful not to burn the chocolate. Divide one portion of dough into two equally sized parts. Mix the chocolate into one half and leave the other plain. Roll each portion into a 9-by-3-inch rectangle. Freeze the rectangles for about 10 minutes, until they’re firm enough to cut and stack. Cut each rectangle into eight 9-by-3/8-inch strips. On a sheet of wax paper, lay four strips next to each other, alternating colors. Press the strips together gently to remove any gaps. Lay another four strips on top of the first layer, alternating colors between layers. Repeat twice more, until there are four layers of four strips each. Trim the edges if desired. Wrap in wax paper and freeze for at least four hours, or up to 4 weeks.

5. For the spiral cookies: Divide the last portion of dough into two equally sized parts. Color one half red and the other green. Between sheets of waxed paper, roll each portion of dough into an 8-by-8-inch square. Without chilling the dough, stack the squares, then tightly roll them together to form a spiral. Wrap the dough in wax paper and freeze for at least fours hours, or up to 4 weeks.

6. When ready to bake, adjust an oven rack to the middle position and heat the oven to 350 degrees. Line a baking pan with parchment paper or a silicone mat. Slice the frozen logs into cookies about 1/8-inch thick. Lay the cookies on the prepared pan, about 1/2-inch apart. Bake for 7-10 minutes, just until the tops no longer look wet. Let the cookies cool on the pan for about 2 minutes, then transfer them to wire racks. Serve at room temperature. Stored in an airtight container, the cookies will be good for at least a week.

Read more...

  © Blogger template On The Road by Ourblogtemplates.com 2009

Back to TOP