Showing posts with label wilton cake classes. Show all posts

Wilton Course II, Class 4

Thursday, October 2, 2008

I finished up Wilton Course II last night. It was fun to actually bring a cake to work on. You feel so much more accomplished when you leave class with a fully decorated cake!

(I interrupt this regularly scheduled post to report that sunlight just broke through the clouds and is shining through my window. Yes, that's right. SUN! We literally have not seen the sun in over a week. It's depressing. Anyway, I'm sure it won't last long. In fact, it's already fading back behind another cloud. Boo.)

We started class by learning and practicing basketweave. We started off on the practice boards, flat on the table. Then we put the practice boards on the stand so we could try to do the basketweave on an upright surface (much more challenging). Once we had that down, we moved on to learning the rope border. Pretty easy. Not much different than a shell, it's just you have to make small "S" shapes over and over.

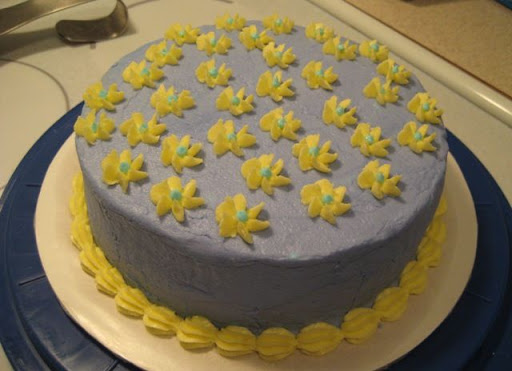
Then we got to move onto our cakes! Very exciting. We started off with the basketweave, which took much more time and a lot more icing than I ever anticipated. Holy cow, my finished cake is HEAVY! There is a lot of buttercream on that sucker.


Next time, I would expand the basketweave by going up one more row at the top. I didn't quite cover the entire side, even after adding the rope border, so I'm not 100% pleased with how it looks. After finishing the basketweave, I did a rope border on the top and bottom edges of the cake.


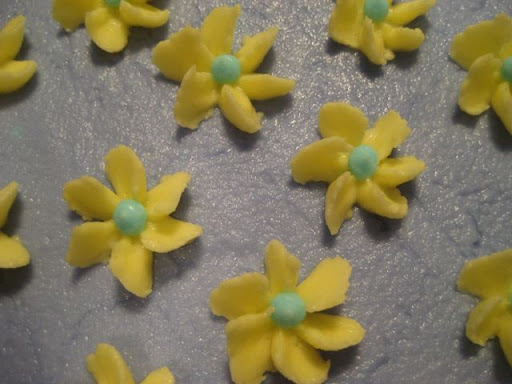
Then it was time to bust out the flowers that we spent three classes making. I had way more flowers than I actually needed for this cake, so I picked over them and chose some of the best ones for the cake. Some of them broke as I was transferring them off of the wax paper and onto the cake (I'm looking at you, daisies!) but most were pretty successful. I did my best to arrange them in a nice way, then filled in gaps and made them look more natural by piping in some buttercream leaves.


Ended it all by adding one of my colorflow birds to the side.


Tada! I'm pretty happy with the results. I'm bringing the cake into work today, and judging from their past reactions, I know I'm going to have to argue to get them to even cut into it and eat it. It's a cake, people! You're supposed to eat it!

Read more...

Wilton Course II, Class 3

Thursday, September 25, 2008

Last night, we worked on learning and practicing five new flowers. We were again working with royal icing. She also asked us to keep saving our flowers so that we can use them all to decorate our cakes in our final class next week. I'm excited to see how it's all going to come together.

Daisies


Victorian roses


Pansies, daffodils, and primroses

Close-up of pansy


Close-up of a primrose (Blogger turned it sideways for some reason, but you get the idea)

Daffodil

Final cake next week! We will be working with buttercream again to learn basketweave and rope borders. We're going to decorate the cakes with all of the royal icing flowers we have already made, and then fill in with buttercream leaves.

I've had fun, but I'm ready to be done with this class. Back in the summer, when we didn't have anything else going on, taking the Wilton course was no problem. Now that I am back into the swing of things with fall, am taking aerobics classes two nights a week, etc. it is just way too much to handle.

Read more...

Wilton Course II, Class 2

Thursday, September 18, 2008

Last night, we worked with color flow and royal icings for the first time. We made little blue birds out of color flow, and then made two different flowers (apple blossoms and violets) and violet leaves out of the royal.

We've been instructed to save all of the flowers and stuff that we make for the final class (in two weeks), when we make our Course II cake. We'll be using all of this stuff to decorate it.

So for now, all of this stuff is hanging out in a Gladware container in my kitchen. Check it out:


Read more...

Wilton Course I, Class 4

Friday, August 15, 2008

I had my final Course I class last night. I got my certificate of completion (woohoo!) and it was a lot of fun. I'm glad I took the course, and actually already signed up for Course II, which begins in September (how could I not--with the deals and the coupon I got for taking Course I, it's only $12.50 for the four classes!).

Last night, we started by practicing sweet peas, ribbons, leaves, and vines. Then it was on to making roses and decorating our final cakes.

My stiff consistency icing wasn't cooperating with me last night. It was extremely hot in our classroom for some reason, and although the consistency was technically correct, my instructor said I would have benefited from putting a little extra shortening in my frosting--it would have made it just a little bit creamier. So unfortunately, my roses aren't as nice as they should have been. I was having a hell of a time getting it to pipe out correctly. And then it wasn't sticking to itself properly--ugh! Frustration. In reality, my practice roses that we made last week looked better than these final roses... but oh well.

I am extremely happy with my final cake. I used the "running the spatula under hot water" trick, which definitely helped me get the base layer of icing much, MUCH more smooth than the last couple of times. No cracking!

The colors aren't exactly what I was imagining. The orange is nice. I was hoping that the pink (technically Wilton's "Rose" color) was going to be a little deeper pink, but it's still pretty. I am going to completely call foul on Wilton's "Leaf Green," however. That shit looks nothing like leaf green. That is NEON. Leaves? Not quite... I'd say it's more appropriate for making SLIME. But I digress. I still used it on my cake since I didn't have any other green option at that moment.

I'm taking the cake to my mom's tonight for a BBQ with a bunch of my family members. Tomorrow is my birthday, so I guess it's technically serving as my birthday cake, too. I made my own birthday cake, what the hell?! :)

Here are a few photos:


I just noticed in this final picture that from this angle, my polka dots on the top of the cake look like little hills. Whoops! I didn't even notice it when I was finishing my cake at home last night. Now that the icing has crusted over a little bit, I'll have to "tap them down" before I present the cake as final to my friends and family.

Overall, Course I was a definite success! On to Course II...

Read more...

Wilton Course I, Class 3

Wednesday, August 13, 2008

We had to bake another cake and bring in more frosting for the third class. Class 3 is when you're supposed to make the dreaded clown cake, but since my instructor is so lax, nobody actually ended up doing it. Everyone ended up working with the drop flowers and shell border we learned instead.

During this class, we practiced figure piping. We made a few heads, faces, etc. and then we did the clown bodies. We also practiced grapes (there is a grapes and vines cake pictured in the Course I book and she was showing us how to do it).

We also spent a good deal of time on the Wilton rose. Last week, she taught us how to build the base with icing, and how to do the center petal. This week, we moved on and learned how to do the 3-petal, 5-petal, and 7-petal layers, completing the rose. The first few I did were a joke, but I did get the hang of it pretty quickly. I was so proud of myself, I actually brought one of my roses home to show my husband. :) Next class, we're actually using roses on our cakes, so we'll certainly be doing more of them.

We learned and practiced the shell border. For some reason, this gave me some trouble. But after a little extra one-on-one with the instructor, I finally figured it out (I think). I ended up using it as a border around my Class 3 cake, and I think it turned out pretty well for a beginner.

Then we learned how to do a couple different kinds of drop flowers. The drop flowers on my cake actually ended up being a cross between the two we learned. Whoops. I didn't realize I was doing the swirl flowers wrong until I got home later and was looking more closely at the book. Oh well.

Anyway, here are a few pictures of my finished Class 3 cake. I apologize in advance for the crappy quality (the color and lighting is off), but it was dark by the time I got home and had opportunities to take pictures of it:


Overall, I wasn't impressed with my finished result. Certainly better than cakes I've made prior to the class, but nothing to write home about. But then I brought the cake to work (had to get it out of the house!) and everyone raved about how fantastic it was, so maybe I'm too critical. Or they're good liars.

I'm most unhappy with the smoothness of my icing. I have had major issues with my first two cakes, with the icing cracking on the cake. I asked my instructor about it at class--she thinks I may be moving around my cake too much, or the cake is "settling" after I ice it.

I am trying a few different methods for my Class 4 cake, so we'll see how it goes. I baked the cake last night and am waiting until tonight to ice it. Hopefully the cake will be all settled by then. I'm also going to do a "hot water spatula" thing that my instructor suggested.

I have my final Course I class tomorrow!

Read more...

Wilton Course I, Class 2

Friday, August 8, 2008

I didn't blog about my first cake decorating class (on Monday) because we didn't do too much. We learned the basics on how to ice a cake smoothly, how to make different consistencies of buttercream frosting, how to set up a bag for piping, etc. I knew some of it already, and some of it I didn't. It was a good first class.

Our "homework" to complete before the second class involved baking a cake, icing it, and bring different consistency frostings, and different colored frostings, to class. Can I just say that all of that prep work resulted in me spending 4+ hours in the kitchen on Tuesday night? It was pretty intense!

I spruced up a box cake mix by adding in a 3.5 oz. box of instant pudding, an extra egg, and some meringue powder. It was really moist! I used chocolate pudding as a filling in between the two layers. I had some trouble smoothing out the yellow icing. You are supposed to wait until the frosting "sets" a bit, and then you can flatten out any lines with wax or parchment paper. No matter how long I let it sit, the frosting never seemed to harden! It kept coming off on my paper. Annoying. But eventually, it was as good as it was going to get.

So, for the second class on Thursday, we practiced some different techniques with different tips on our practice boards, and then we got to work on our cakes. Technically, Class 2 is the "rainbow cake" that you often see people doing. Fortunately, my instructor is not at all "by the book," so we are allowed to do whatever we want each class, as long as we incorporate the techniques that she is teaching.

I went online and found a simple flower design and printed it out to bring to class. We learned how to do a design transfer with wax paper and piping gel, and then I got going outlining the designs in buttercream, and then filling them in with the star tip.

We are having friends over tonight (two other married couples). Since both of them are expecting babies--one a boy on September 4, the other a girl on October 21--I decided to make the cake baby colors.

I am pretty happy with the end result. Not the prettiest cake I've ever seen, but definitely the best thing I have ever done with frosting. :)


My third class is on Monday, and I have to make another cake and some more frosting for it. Looks like I'll be spending some time in the kitchen this weekend!

**Update** Our friends were over and loved the cake. But I still have like half a cake left. What the heck am I going to do with all of this cake I'm going to be making over the next week? Jeez. Anyone want half a cake? Free to the first bidder. :)

Read more...

Suzie Homemaker

Friday, July 18, 2008

Holy crap.

I've been married four weeks... I might as well be going on 40 years. What have I done?

Well, I've signed up for cake decorating classes.

And if I'm being perfectly honest, nothing has ever made me feel so old. But if I'm going to be even more honest... I'm super excited for them. Ha!

Michael's offers Wilton cake decorating classes, and I'm planning on starting them at the beginning of August. The first course is two weeks, four classes... and teaches all of the cake decorating basics.

I'm crafty, but I really suck with icing. You need proof? Pathetic. So I'm hoping to learn a few things. The courses are cheap--$17-$20 per course (each course has the four classes). Of course, you need quite a few supplies. While I was at Michael's last night, I picked up a cake decorating kit, and a few other things (parchment paper, a cool stand mixer spatula, etc.). I also picked up wax paper and toothpicks today at Wegmans.

My cake decorating caddy

All of the icing tips, colors, etc. that came with the kit

Some of the other supplies the came with the kit, plus the extras I bought


If I had to guess, I'd say that the start-up cost for the supplies is like $50-$60. But once you have all of this stuff, much of it lasts forever. You know I'm old and married when I'm thinking things like, "Wow, this will be a really great skill to have for our kids' birthday cakes!" Uhhh, yeah.

Anyway, I'll keep you all updated on my progress through Course 1. Should be interesting.

So, local friends and family... I know you're out there. Anyone interested in taking the course with me? C'monnnnnn. You know you want to. Let me know. It starts August 4.

Read more...

  © Blogger template On The Road by Ourblogtemplates.com 2009

Back to TOP