Bread Machine Pizza Dough, Part Deux

Friday, January 29, 2010

Pizza dough... made by a bread machine. I mean, really: It's genius.

I've even posted about it before. And while we love the tangy flavor that the beer brings to that recipe, I still longed for a more traditional pizza dough. But I still wanted the convenience of the bread machine, you see.

Thankfully, Google came to the rescue. A bread machine pizza dough sans beer.


It is oh-so-good.

We tried this for the first time last Friday--we actually took the dough and all of the pizza toppings over to our friends' house and had dinner with them. Unfortunately, in fear of undercooking the pizza, we overcooked it a little bit. It wasn't burned, but was very crispy. Although we enjoyed it thoroughly (the four of us polished off the whole pizza), we knew we had to make the dough again soon so that we'd be able to judge it the way it was meant to be judged--when baked to perfection.

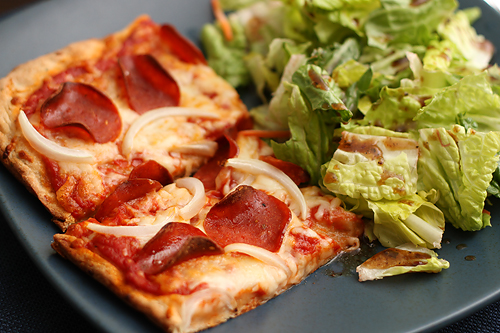
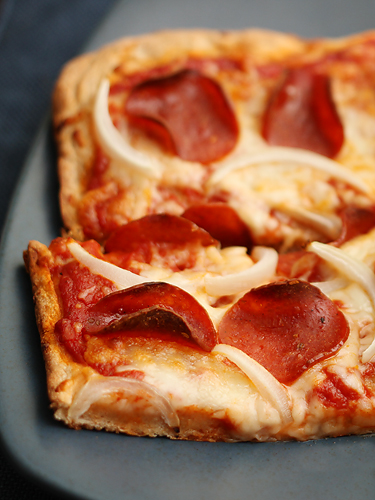
So another Friday night rolled around, and Michael and I decided we needed to give this another try (plus, we still had extra pizza toppings lying around). Tonight's pizza was even better than I was expecting. We've found our "go-to" pizza dough, that's for sure.

Depending on how thick you like your pizza crust, this makes quite a bit of dough. When we made it last week, we stretched the dough to cover a 17 1/4" x 11 1/2" cookie sheet. The crust was not too thick, and not too thin, and as I mentioned before--this pizza was the perfect amount for four people.

However, for just the two of us tonight, we decided to use half of the dough and freeze the other half. Right at the beginning of the "second rise," I took the dough out of the bread machine, weighed it on my food scale, and divided it into two equal halves (if you don't have a food scale, you can just eyeball it). One half, I put back into the bread machine to continue with the second rise. I sprayed the other half with cooking spray, wrapped it tightly in plastic wrap, then put it in a freezer bag. When it comes time to use it, I'll put it in the fridge the day before to thaw it, then remove it from the fridge and its wrapping and let it rise for 30-60 minutes before making the pizza. With the half we used tonight, I stretched the dough to cover a small cookie sheet (13 1/4" x 9 1/4"). It was perfect for a "dinner for two." :)

Easy Peezy Pizza Dough (Bread Machine Pizza Dough)
(Source: Adapted from Recipezaar.com)

Ingredients:
- 1 cup + 2 tbsp. water
- 2 tbsp. olive oil
- 2 tbsp. sugar
- 1 tsp. salt
- 2 1/4 cups all-purpose flour
- 1 cup whole wheat flour (if you don't like wheat flour, use all-purpose for this, too)
- 1 packet yeast
- garlic powder, dried basil, dried oregano

Directions:
1. In bread machine, add wet ingredients (water and olive oil), then dry (sugar, salt, flours).

2. In the dry ingredients, make a little "well" with your finger. Pour packet of yeast into the indent.

3. Sprinkle garlic powder, basil, and oregano on top of everything. Adjust amounts to your taste--these spices add flavor to your dough.

4. Select the dough cycle on your bread machine; press start.

5. Spray a pan (size of your choice) with cooking spray. Once dough cycle is done, shape the dough and spread evenly into your pan.

6. Add toppings of your choice. Bake pizza in 425 degree oven for 18-25 minutes.

Read more...

Forward

Wednesday, January 27, 2010

I have this daily desk calendar. It may be a Barack Obama calendar. *ahem* OK, so it is a Barack Obama calendar. The page for each day contains a quote from our president. My mother-in-law got it for me for Christmas, and I'm enjoying it so far. Obviously, some days' quotes are better than others. Like today.

"Our future is what we build it to be."
- Barack Obama, March 23, 2009

I'm not one to believe in destiny. Well, I guess that's not entirely true. I sometimes like to believe there is a plan for our lives. I like to believe there is a purpose.

But I also don't believe that we can sit idly by and our lives will unfold as they should. Perhaps there is a current leading the way, but still, I'm the one steering the ship.

I hate to hear people complain about situations in their lives. I'm not innocent; I do it, too. But when someone is miserable in their current state of living, my question is always, "Well, what are you doing to change it?" I know that often times, change is not easy to come by. But if the "American Dream" has taught us anything, it is that anything is possible.

Conan O'Brien actually said something to this effect on his last show on Friday. He said,

"All I ask of you--especially young people--is one thing. Please don't be cynical. I hate cynicism. It's my least favorite quality and it doesn't lead anywhere. Nobody in life gets exactly what they thought they were going to get. But if you work really hard and you're kind, amazing things will happen. I'm telling you, amazing things will happen."

It's not a unique message, but it's a good one. You have to work hard. You have to push through. You have to make some tough decisions. You have to put in the time and effort. It's not usually fun. In the end, though, you will end up in a better place. Maybe it's not exactly where you hoped you'd end up, and maybe you didn't achieve exactly what you set out to achieve. But you will have made changes in your life and you will be better for it. And if you're not, keep working and keep pushing, because change will come again.

Lately, we have made moves to make some pretty significant changes in our lives. At this moment, for these particular changes, we've done all that we can do. It is during the "wait and see what happens" period that I believe in the plan. We've played all of our cards and now our future is in the hands of something or someone else. And it is now that I turn to the mantra, "What is meant to be will be." We've set the wheels in motion. We've made the choices, and now we wait for the outcome. If this doesn't work out, we'll press on and try another route.

Because the future will be what we build it to be.

I hope it's a good one.

Read more...

Ketchup Day

Sunday, January 24, 2010

It's Ketchup Day: January 2010 Edition. Enjoy!
______________________________________________________

Life has been busy and keeping us on our toes. Blogging has been difficult this month, but I'm trying to keep my head above water. I'm happy that January is almost over, because February is a short month (even though it always feels long), and once March hits, it's almost spring.

Every year that I live through winter, I hate it more and more. Don't get me wrong; I like having four seasons. It's just that I wish winter only lasted through Christmas. Really, I'm starting to believe I'm not meant for the cold. I dream of picking up everyone we know and love, and moving (all together!) to a warmer climate. Wouldn't that be nice?

As much as I'm bitching about the cold, we really had a nice weekend. Yesterday was sunny and relatively warm, so we took Tessa for a really long walk. Today wasn't as nice (it rained), but the temperatures were in the 40s so it is hard to complain. Although I always appreciate the warm days that are a reprieve, I'm always a little bit bitter about them because I know they're just a tease. This week, we're back into the 20s and snow, snow, snow. BLAH BLAH BLAH.
______________________________________________________

Remember the heart-wrenching story about little Maddie? Her mommy, Heather, had a new baby on Friday. I couldn't be happier for an internet stranger. The child she lost cannot, of course, ever be replaced, but I feel like love is so tremendously healing, and that darling little Annabel is the best thing that could have happened for her parents.

Ironically, someone else had a baby this weekend, too. Jenny, who I've written about before because her blog was the first I ever saw and read, welcomed her third daughter on Saturday. Like Heather, Jenny lost her first daughter much too soon. Allie died of leukemia in 2004 at just 9 months of age. Today, her second daughter, Maggie, is 4 years old, and the family is now complete with the addition of little Katie.

Happiness all around!
______________________________________________________

A few of you have asked (in the comments of other posts) about our upcoming vacation plans. Well, the truth is that we don't have any. Yet. But we're working on it.

We have several ideas, but we have quite a few balls up in the air right now and we need to get everything straightened out before we start making decisions about any vacations. We're hoping that our next trip will happen around the end of April, but we'll see. I'll be sure to keep you all posted about where we're going next! :)

I think that by the time our next one rolls around, this will have been the longest stretch we've gone between vacations since before we were married... so I'm sure I'm going to be really ready!
______________________________________________________

I've made quite a bit of progress on my 101 in 1001 list lately! I went in on Friday and crossed off and updated a bunch of things. Woohoo! Check it out, if you want.
______________________________________________________

We've been watching football all day. Earlier, we went to Champps for the Jets vs. Colts game. I didn't really know who to root for, as I hate Peyton Manning, and I couldn't in good conscience root for the Jets (they are division rivals for the Bills). By the end, however, I realized that I would have preferred the Jets. I think. I guess I'll never really know. But I found myself scowling when I realized that Peyton and the Colts would be going to the Super Bowl again!

The second game, Vikings vs. Saints, is still going on now, and it's a pretty interesting game so far. I'd really like to see the Saints pull this one out! I like Drew Brees, and let's face it--I've made no secret of how I feel about Brett Favre. We'll see what happens. No matter the outcome, we'll be gathering a small group at our house for the Super Bowl again this year. I always look forward to that!
______________________________________________________

And with that, another weekend comes to a close. I am not looking forward to going back to work this week. It seems like the work weeks are continuously getting longer, while the weekends are getting shorter. *sigh*

Read more...

So Long, Conan

Saturday, January 23, 2010

I know I already bitched about this a couple of days ago, but I couldn't help but comment again, now that "The Tonight Show with Conan O'Brien" is officially a thing of the past.

When we got home from having dinner with friends last night, I was too tired to stay up and watch the last episode of Conan. However, I definitely didn't want to miss it, so I made sure to DVR it.

Tonight, as we ate dinner, we watched Conan's last show. Throughout the whole thing, I couldn't help but feel really sad. Especially toward the end when he got all teary and explained what the whole experience meant to him, and how grateful he was for his staff, crew, and fans. Maybe I'm overly emotional, but I was pretty damn close to tears myself!

I was going to post a video clip from the last show, but NBC's "share video" function isn't working. (Surprise, surprise. Can they do ANYTHING right?)

I found myself remembering back in the spring, when I was sad to see him leave New York and his late show. But it was different then, because we knew we'd still be seeing him on TV. Now, no one can be sure where he will end up.

I hope to see him back on the air--somewhere, somehow--in September.

Read more...

Recent Read: Girls' Night In

Friday, January 22, 2010

I'm pretty behind on reviewing books! I read this one back in November. Whoops.

Perhaps part of the reason I neglected this write-up for so long is that I didn't find this book particularly inspiring. To be fair, I wasn't expecting much. It'd been a while since I'd read any "chick lit" and I figured this would be a fast, easy, and probably fun read.

Girls' Night In is a collection of short stories written by a variety of chick lit authors, such as Sophie Kinsella, Meg Cabot, Jennifer Weiner, and more. Some of the stories are engaging and entertaining, and some--well, aren't. I flew through the first 2/3 of this book, but had a hard time finishing it. By the end, I found myself skipping some of the stories after reading only a page or two into them.

The other problem was that I found the short story format to be limiting for these types of tales. I couldn't get into the characters because there just wasn't enough time to do so.

Honestly, I'm not much of a chick lit kind of girl, so this just wasn't my thing. Still, I like to read the light and easy stuff every once in a while, so I gave this a fair chance. And while parts of it were fun, I certainly wouldn't file this under my "favorites" any time soon (or ever).

Read more...

Conan Rules, Leno Drools

Thursday, January 21, 2010

I'd like to tell you all that I predicted this. And I sort of did.

You see, I knew that Leno's primetime gig was never going to last. Still, I could never have predicted what a clusterfuck of a situation this whole thing would become.

Conan has effectively been thrown out on his ass for no reason at all, except that Jay Leno is a selfish douchebag. It is being reported today that Conan has officially signed paperwork that releases him from his contract with NBC. And so it's over. OVER FOR NBC, anyway. I hope that Jay Leno's "Tonight Show" and the network burn to the ground. I don't watch anything else on NBC, and I have never been so grateful to not be supporting a particular network.

NBC's treatment of a man who was a long-time, dedicated employee is completely sickening to me. I know it's not the first time someone has been wronged for the sake of "business," but the way this has played out has been ludicrous.

The worst part of it all is that Conan O'Brien is truly a class act. I loved his statement released earlier this month, when all of this controversy really started to pick up. I especially loved the end (after several paragraphs of expressing his disappointment and explaining his position):

Have a great day and, for the record, I am truly sorry about my hair; it's always been that way.

LOVE.

Conan has handled himself with grace and poise throughout the whole process during which NBC completely screwed him over. (To be fair, he does get $45 million out of the exit deal. Not too shabby!)

Most frustrating is the fact that everyone knows that NBC and Jay Leno are wrong... except NBC and Jay Leno. Jimmy Kimmel made an absolute fool out of Leno (on Leno's own show!) last week. And then, just this morning, I saw this clip on Michelle's blog:

Perfect.

Here's hoping Conan ends up with a much better gig and Leno falls in the ratings (AND off the face of the Earth).

TEAM CONAN, baby. TEAM CONAN.

Read more...

Gingersnap Trifle

Monday, January 18, 2010

I love trifles. They are a perfect dessert option because 1) they are pretty, 2) they are tasty, and 3) they are easy. And really... what's not to love about that?

This particular trifle was "invented" by our friend, Greg, a couple of years ago. He served it to us at a SuperBowl party and I consequently stole the idea and have made it a few times since then. It doesn't get much more simple than this--pudding, cool whip, and gingersnap cookies.


Taking another cue from good ol' Greg, I make this even simpler by purchasing pre-made pudding. Yes, the kind in the little single-serve cups. (I know.) I buy them when they're on sale for $1 per 4-pack, and it's just so much easier than fiddling with making pudding. I don't even like to mess with the instant kind, because I always find that the consistency is a little lumpy looking so it's not as pretty! Take my word for it.

You can also make this dessert pretty light by using sugar free, fat free pudding, and fat free cool whip.

My favorite part is how the layers of gingersnaps in the middle get all soft and chewy. I'm not a big fan of gingersnaps in general but I love them in this trifle. Get thee a trifle bowl and make this... STAT!

Gingersnap Trifle

Ingredients:
- 6 cups vanilla pudding (or 12 single-serving cups)
- 4 cups caramel pudding (or 8 single-serving cups)
- 2 (8 oz.) containers of cool whip, softened
- 30-40 gingersnap cookies (depending on size)

Directions:
1. Spoon three cups of vanilla pudding into the bottom of the trifle bowl, and spread into an even layer.

2. Place a single layer of gingersnap cookies on top of the pudding.

3. Spread one container of cool whip in an even layer on top of the cookie layer.

4. Place another layer of gingersnap cookies on top of the cool whip.

5. Top cookie layer with all 4 cups of the caramel pudding and spread evenly.

6. Spread the other container of cool whip on top of the caramel pudding.

7. Place another layer of gingersnap cookies on top of the cool whip.

8. Spoon the remaining three cups of the vanilla pudding on top of everything and spread evenly.

9. Top with a final layer of gingersnap cookies for decoration.

Read more...

Sooo Big

Sunday, January 17, 2010

I've been a crappy blogger. This past week has been interesting and busy. I'm trying to get caught up and will try not to fall behind again! (At least not anytime soon.)

We've had dinner with my family the past two Sundays. Dinner and playoff football... yesssss! Last week, we ordered pizza, and today, I made a feast (homemade salsa and chips for appetizer, chili for dinner, banana cake for dessert).

Just a few pics of Hunter...


He's already starting to feed himself cheerios and puffs. I can't believe how big he is getting!

My mom bought him this Sabres fleece... it is a size 2T. It's sort of scary how it fits him (it's really not all that big!).

We saw all three nephews this weekend! I love it when life works out that way.

Read more...

Lo-Lo and Me

Saturday, January 16, 2010

My sister-in-law came up to visit today and we were happy to indulge in some time with our nephews.


My little Logan was an absolute delight. I can't believe we're going to be celebrating his first birthday soon! He's still such a baby! He has this low, raspy laugh that is absolutely hilarious. I joked that he sounds like he is mimicking The Exorcist. Melissa said that he is actually mimicking Brendan! Needless to say, I got a complete kick out of it.

It was a bit of a whirlwind visit--they were only with us for a few hours--so when they were getting ready to leave, I realized I hadn't even taken any photos! (Which, you know, is VERY unlike me.) Thankfully, Michael had snapped a few so we didn't leave completely empty-handed. But none of Brendan this time! :(

Just my little Lo-Lo. Oh, I love him so.

Read more...

Black Bean Burgers

Friday, January 15, 2010

I love black beans.

I love burgers.

And boy, do I love ketchup.

Even so, I have to admit that I was a little bit skeptical of this recipe for black bean burgers. Ketchup--on BLACK BEANS? I was not convinced. But the potential for greatness outweighed my skepticism, and we made them for dinner on Wednesday night.


This was one of those cases where good eats (black beans) + good eats (burgers) + good eats (ketchup) = FANTASTIC EATS. These burgers are so jam-packed full of flavor and spice that I immediately said to my husband, "We should make these again next week!" Oh, and we will.

The original recipe calls for sun-dried tomatoes, spinach, and a sun-dried tomato dressing to be used to top the burgers, but I took Melissa's advice and went for the traditional burger toppings. We used thin slices of cheddar, lettuce, tomato, and ketchup. But, in case you want to try the dressing, I've included the original recipe below.

Black Bean Burgers
(Source: Food Network, as seen on Delicious Meliscious)

Ingredients:
- 2 (15-ounce) cans black beans, drained and rinsed
- 2 shallots, minced
- 1 teaspoon red pepper flakes
- 1 teaspoon smoked paprika
- 1 teaspoon Worcestershire sauce
- 1 teaspoon hot sauce
- 1 teaspoon freshly chopped cilantro leaves
- 1 egg white, slightly beaten
- 3 tablespoons whole-wheat flour
- 1/2 tablespoon kosher salt
- 1 tablespoon cracked black pepper
- 3 tablespoons olive oil
- Spinach
- Sliced roasted red peppers, jarred
- Sliced red onion
- 4 multi-grain rolls (or your favorite hamburger rolls)
- Szechuan Tomato Dressing, recipe follows

Directions:
1. In a large bowl, finely mash the black beans with a potato masher or your hands. Add the shallots, red pepper flakes, smoked paprika, Worcestershire, hot sauce, cilantro, egg white, flour, salt and pepper. Mix well with a wooden spoon. Form into 4 patties and arrange on a platter.

2. In a large saute pan over medium-high heat, add the oil. Sear patties for 3 to 4 minutes on each side until they have a nice crust. Remove the patties to a paper towel lined platter. Assemble the sandwiches with a patty, some spinach, roasted red peppers and red onion on the multi-grain rolls. Top with a good drizzle of Szechuan Tomato Dressing and serve.

Szechuan Tomato Dressing:
- 1/4 cup Szechuan sauce
- 1/4 cup chopped sun-dried tomatoes
- 1 tablespoon freshly chopped cilantro leaves
- 1/4 cup olive oil
- Salt and freshly ground black pepper

In a small bowl, add the Szechuan sauce, tomatoes and cilantro. Whisk in the olive oil and season with salt and pepper, to taste. Use as a dressing for the black bean sandwiches.

Read more...

Gone

Wednesday, January 13, 2010

Earlier this week, I told you how I was so over our Christmas decorations. I was done.

Tonight, it is all gone. The house is decluttered. It's unChristmased. It's deholidayfied. Or something like that.

And wow, does it feel good.

New rule: Christmas decorations are to ALWAYS be taken down the weekend after New Year's. No ifs, ands, or buts.

P.S. I am sorry for the lack of quality blogging this week. I am exhausted! I still have a few more recipes to post. I've also got a little bit of writer's block, so if you have any ideas or questions--shout 'em out. I could use a little bit of help! :)

Read more...

Red Chile Chicken & Rice with Black Beans

Monday, January 11, 2010

I owe this recipe a lot. This recipe is the reason I found this amazing homemade salsa. And well, for that alone, I'm in love with this red chile chicken and rice with black beans.


But as it turns out, it's really quite awesome on its own. With 2.5 tablespoons of ancho chile powder, I'm sure you can guess that this dish certainly does not lack flavor. And it doesn't. But while that may seem like a lot of chile powder, it's not too much, either. Since Mexican flavors are some of our favorites, this is yet another meal to add to our regular rotation.

Topped with the amazing homemade salsa, this is a meal to be reckoned with.

When making this, we had a few challenges with the rice. Mainly, it took longer to cook than Annie states, but that might be because I didn't stir-fry it enough in the beginning. Make sure not to undercook it at that stage. Also, we found that to help the rice along, we had to add more chicken broth to the pan so that the rice had more liquid. The rice ended up absorbing all of the extra, and in the end, it came out well. I just wanted to make note of that in case any of you guys run into the same issue!

Red Chile Chicken & Rice with Black Beans
(Source: Annie's Eats)

Ingredients:
- 2 tbsp. canola oil
- 2 boneless, skinless chicken breasts, butterflied into halves (4 halves total) -- I used approximately 1 lb. of chicken breasts, cut into small chunks
- 2.5 tbsp. ancho chile powder, divided
- 1 medium onion, chopped
- 1 cup long-grain rice
- 4 cloves garlic, minced
- 1 1/2 cups chicken broth
- 1 (15 oz.) can black beans, drained and rinsed
- 1/4 cup green onions, chopped (or 1/3 cup chopped fresh cilantro)
- 1/2 - 1 cup salsa, for serving

Directions:
1. Heat the oil in large heavy pot over medium-high heat. Season both sides of the chicken breast halves with salt and sprinkle with half of the chili powder. (If you've cut the chicken into pieces like I did, simply sprinkle/rub the salt and chile powder onto the chicken pieces.) Place the chicken in the hot oil and brown on each side, 2-3 minutes. Remove to a plate, leaving behind as much oil as possible.

2. Add the onion and rice to the pot. Stir for several minutes, until the rice turns from translucent to opaque. Add the garlic and the remaining chili powder to the pot. Cook for 1 minute, stirring, then add the chicken broth and salt to taste. Stir well. Bring the mixture to a boil, then reduce to a simmer on medium-low heat. Cover and cook for 10 minutes.

3. Cut the chicken breasts into 1-inch pieces (if you didn't do it before) and add them to the pot, along with the beans. Re-cover the pot and allow to cook 12 minutes longer.

4. Sprinkle the green onions on top of the chicken, beans and rice. Test a grain of rice – it should have no more than a hint of chalkiness at the center. If the rice has the correct texture, replace the cover, remove the pot from the heat and let stand 5-10 minutes. If the rice is not completely cooked yet, cook for 5 minutes longer before covering to let stand.

5. Fluff the mixture with a fork and serve with salsa.

Read more...

Done

Sunday, January 10, 2010

The day after Thanksgiving brings CHRISTMAS.

Lights and trees and carols and all things Christmas. And as I know I've made you aware, I love every minute of it. Aside from summer, Christmastime is my favorite time of the year.

But there comes a time when I am done with it. Completely done. D-O-N-E.

I want the tree to come down.
I want the lights to be turned off.
I want the knick-knacks put away.
I want the gifts to be organized.

In other words, I WANT MY HOUSE BACK.

I have so hit that wall. The problem is that all of our Christmas boxes and containers are in our garage storage space, and it has been too damn cold to even consider spending the 5-10 minutes necessary to dig it all out. Sooo, here I sit, staring at our still-standing Christmas tree.

And it's killing me.

Today, I at least started by taking down all of the lights from around the windows, unwrapped the garland from the railings, and took down the stockings. But next weekend... nothing can save the tree. It's gone, baby. Gone.

Until next year...

Read more...

Homemade Salsa

Friday, January 8, 2010

I've tried to make my own salsa before. It was a few years ago, and it didn't go well. I can't really remember what went wrong, but I think that overall, the recipe I used suffered from a lack of flavor. I was not impressed, and vowed to stick to the store-bought and restaurant varieties.

Last week, I came upon Annie's salsa, and read through her post about it. I figured that if she doesn't even like salsa but still likes this, then it must be good. We were planning to make another one of Annie's recipes for dinner on Saturday (I'll be posting about that later), so we decided to make the homemade salsa to go along with it.

We decided to give homemade salsa another chance.


And boy, we were pleased. You're supposed to let the salsa sit in the refrigerator for at least two hours prior to serving so that the flavors can all meld together. After I was done mixing this all together, it smelled so good that we couldn't help but sample it right away. We were blown away! This salsa is wonderfully flavorful, what with the garlic, cilantro, and all the other good stuff. Plus, it's really easy to throw together.

We'll surely continue to buy salsa in a jar if a recipe calls for it to be mixed in, but for chips and salsa? Not going to happen. I can't imagine going back to store-bought salsa now. So what I'm saying is this: If you try this for yourself, be prepared for a lifestyle change! You'll never buy salsa again. :) Also, this makes quite a bit of salsa, and you should be prepared to eat it. We've almost kicked the entire batch already, and will be making more tomorrow!

Annie's Homemade Salsa
(Source: Annie's Eats)

Ingredients:
- 2 fresh jalapeno peppers, seeded and very coarsely chopped
- 4 cloves garlic, halved
- 2 large vine-ripened tomatoes
- 1 (28 oz.) can diced tomatoes (drained or not, depending on how much liquid you want in your salsa)
- 2 tbsp. red wine vinegar
- 1 tbsp. cumin
- 1/2 sweet yellow onion, coarsely chopped
- 1/4 tsp. salt
- 1/2 tsp. ground cayenne pepper
- 1/4 cup fresh cilantro
- juice of one lime

Directions:
1. In the bowl of a food processor, combine the jalapenos and garlic. Process until finely chopped. Scrape down the sides of the bowl.

2. Add all other ingredients to the food processor. Pulse in very brief pulses until the vegetables have reached the size you desire (it does not take many pulses so don’t overdo it).

3. Transfer to an airtight container and refrigerate at least 2 hours before serving to allow the flavors to blend.

Read more...

Abra Cadabra

Wednesday, January 6, 2010

If I exercised a little magic, do you think Kate Gosselin would finally go away?

Because this......is ridiculous. Seriously? The cover of People Magazine? Again? Who gives a crap about this woman and her kids' struggles, how she's dealing with Jon's drama, and how she's making room for romance? Who cares?

Oh, and that weave/extension action she has going on? Terrible.

Read more...

Pizza Breadsticks

Tuesday, January 5, 2010

When it came to food, I didn't do much planning ahead for New Year's Eve. I knew I was going to bring something to the parties we were attending, but didn't think too much about what that would be. That morning, it was crunch time and I had to figure it out, and fast.

I turned to an oldie but a goodie--pizza breadsticks. I've been making these for a few years now. I've brought them to several parties and they're always a hit. I knew I hadn't served them to this particular group of people, so it was an easy decision. Plus, they don't take much time to pull together, so that's a bonus.

These are made with store-bought pizza dough. Pepperoni and mozzarella cheese are folded into the dough, then the dough is cut into small breadsticks and twisted before baked. Served with pizza sauce for dipping, these are a fantastic and addicting snack!

Pizza Breadsticks
(Source: Adapted from Rachael Ray)

Ingredients:
- 1 tube ready-made pizza dough, recommended brand Pillsbury
- 24-36 pepperoni slices (I use turkey pepperoni)
- 1/2 cup mozzarella cheese (or use a little more or less, based on your preference)
- 1 jar of your favorite pizza sauce

Directions:
1. Preheat oven to 375 degrees.

2. Unroll the pizza dough onto a lightly floured surface. Stretch to make a relatively even rectangle. In an even layer, on one half of the dough, place the pepperoni down onto the dough, making sure to leave a 1-inch border around each edge. Sprinkle mozzarella cheese over the pepperoni.

3. Fold over the other half of the dough and press down gently on the edges to seal the halves together. Gently pat down the folded dough.

4. Use a knife or pizza cutter to cut 8-10 thin strips (about 1-inch thick). Your breadsticks will be pretty long. If serving at a party, cut the strips in half length-wise so that they are a more manageable size.

5. Holding the ends of each strip, gently twist once, being careful not to let all the cheese and pepperoni fall out (some will, though). Place twisted strips onto baking sheet. After all strips are twisted and placed on the baking sheet, feel free to take any stray pepperoni/cheese pieces and tuck them back into the openings in the twisted strips.

6. With nonstick cooking spray, spray the entire pan, including the pizza breadsticks. Bake until golden brown, about 12-18 minutes. Remove from oven and serve as soon as possible. Serve with pizza sauce.

Read more...

New Year, New Look

Monday, January 4, 2010

Now that the holidays are over, clearly the Christmas blog layout had to go. Although I do always hate to part with it! :)

Keeping with the season, though... I give you Heather Drive's new winter design. And with the temperatures around these parts lately, it's definitely winter (I've been freezing my buns off).

You'll notice some new shades of blue, and lots and lots of snowflakes. I even updated the header with new pictures and it got some "snow" as well.

Now I just have to start brainstorming for spring!

Read more...

Caramel Cocoa Crispy Bars

Sunday, January 3, 2010

I have so many recipes to share from this week! It's going to take me a while to get caught up. I hope you guys are up for all of these food posts. :)

For New Year's Eve, we were going to a couple of different parties, and of course, we couldn't go to either one of them empty-handed. For my brother's party, I decided to make a dessert. I went through several starred recipes in my Google Reader, looking for something relatively easy, but wonderfully tasty. After putting my "finalists" up for votes from Michael and Cristina, we settled on these caramel cocoa crispy bars.


These "fancified" rice krispy treats flew off of the platter at the party. They're irresistible, and were a wonderful treat with which to welcome the new year. The cocoa krispies cereal is mixed with melted marshmallows and butter, pressed into a pan, drizzled with melted caramel candies, and topped with mini chocolate chips. Start your year off right--make these!

Caramel Cocoa Crispy Bars
(Source: Adapted from Annie's Eats)

Ingredients:
- 3 tbsp. butter
- 1 (10 oz.) package marshmallows
- 6 cups cocoa crispy cereal (brand name or generic, both work fine)
- 20-24 caramel candies, wrappers removed
- 1-2 tbsp. milk, half-and-half, or cream
- handful of mini chocolate chips

Directions:
1. Prepare a 9x13" pan by greasing with butter or nonstick spray.

2. Melt the butter in a large saucepan over medium heat. Add the marshmallows, stirring until completely melted. Remove from heat.

3. Working quickly, add the cereal and stir until it has been evenly coated with the melted marshmallow mixture. Pour the treats into the prepared 9x13" pan. Using a heavily-greased spatula (spray generously with nonstick spray), press the cereal mixture down into the pan evenly.

4. To make the caramel topping, place the candies into a heatproof bowl. Microwave in 15-second intervals, stirring in between, until completely melted. Before the last interval, add 1 tbsp. of the milk/cream, heat, and then stir to combine. If necessary, add another tbsp. of milk/cream to make the caramel easy to drizzle. Drizzle over the top of the cocoa crispy bars. Sprinkle the handful of mini chocolate chips immediately, and press down lightly to help them adhere to the caramel.

5. Allow the bars and the caramel topping to set completely. Cut into bars for serving.

Read more...

Overnight Cinnamon Rolls

Saturday, January 2, 2010

I have been wanting to try to make homemade cinnamon rolls for about a year now. No joke. It's just that they require quite a bit of advanced preparation, so you have to plan ahead. Because of all that prep, they're also a bit time-consuming, so it's hard to muster up the motivation to make these. And then we're just not that all into breakfast in this house. While we love breakfast foods, most mornings we prefer simple cereal.

But as Christmas was approaching, I decided that I'd make cinnamon rolls--not once, but twice. Once on Christmas morning for our big breakfast with my family, and then again the day after that for a brunch at Michael's sister's house. I bought all the ingredients, read through the recipe to prepare myself, and then... well, it didn't work out. I didn't make them for Christmas morning, and I didn't make them for brunch the following day, either. There was just too much going on and not enough time to devote to these cinnamon rolls.


So when we had my sister-in-law (home on holiday break from college) come over to hang out with us and spend the night earlier this week, I knew that I just had to make cinnamon rolls for the three of us to enjoy in the morning.

I had never attempted homemade cinnamon rolls before, so this was all new to me. And I'm always worried about working with yeast, so this was kind of challenging! But it all worked out in the end. The cinnamon rolls? Absolutely amazing. The only thing left to figure out is when we'll have the opportunity to make these again!

Overnight Cinnamon Rolls
(Source: Confections of a Foodie Bride, adapted from Food Network)

Yields 12 rolls

Ingredients:
Dough:
- 4 large egg yolks, room temp
- 1 large whole egg, room temp
- 1/4 cup sugar
- 6 tbsp. unsalted butter, melted
- 3/4 cup buttermilk, room temp
- 20 oz all-purpose flour (approximately 4 cups), plus additional for dusting
- 1 pkg (2 1/4 tsp) instant dry yeast
- 1 1/4 tsp kosher salt
- Vegetable oil or cooking spray

Filling:
- 1 1/4 cup light brown sugar, packed
- 1 1/4 tbsp. ground cinnamon
- pinch salt
- 2 tbsp. unsalted butter, melted

Icing:
2-3 tbsp. milk
1 cup powdered sugar

Directions:
1. For the dough: in the bowl of a stand mixer with the whisk attachment, whisk the egg yolks, whole egg, sugar, butter, and buttermilk. Add approximately 2 cups of the flour along with the yeast and salt; whisk until moistened and combined.

2. Remove the whisk attachment and replace with a dough hook. Add all but 3/4 cup of the remaining flour and knead on low speed for 5 minutes. Check the consistency of the dough, add more flour if necessary; the dough should feel soft and moist but not sticky. Knead on low speed 5 minutes more or until the dough clears the sides of the bowl.

3. Turn the dough out onto a lightly floured work surface; knead by hand about 30 seconds. Lightly oil a large bowl. Transfer the dough to the bowl, lightly oil the top of the dough, cover and let double in volume, 2 to 2 1/2 hours.

4. For the filling: Combine the brown sugar, cinnamon and salt in a medium bowl. Mix until well incorporated. Set aside until ready to use.

5. To assemble: Butter a 9 by 13-inch glass baking dish. Turn the dough out onto a lightly floured work surface. Gently shape the dough into a rectangle with the long side nearest you. Roll into an 18 by 12-inch rectangle.

6. Brush the dough with the 3/4-ounce of melted butter, leaving 1/2-inch border along the top edge. Sprinkle the filling mixture over the dough, leaving a 3/4-inch border along the top edge; gently press the filling into the dough.

7. Beginning with the long edge nearest you, roll the dough into a tight cylinder. Firmly pinch the seam to seal and roll the cylinder seam side down. Very gently squeeze the cylinder to create even thickness.

8. Using a serrated knife, slice the cylinder into 1 1/2-inch rolls; yielding 12 rolls. Arrange rolls cut side down in the baking dish; cover tightly with plastic wrap and store in the refrigerator overnight or up to 16 hours.

9. Remove the rolls from the refrigerator and place in an oven that is turned off. Fill a shallow pan 2/3-full of boiling water and set on the rack below the rolls. Close the oven door and let the rolls rise until they look slightly puffy; approximately 30 minutes. Remove the rolls and the shallow pan of water from the oven.

10. Preheat the oven to 350 degrees.

11. When the oven is ready, place the rolls on the middle rack and bake until golden brown, or until the internal temperature reaches 190 degrees on an instant-read thermometer, approximately 25-30 minutes.

12. While the rolls are cooling slightly, make the icing by whisking the milk and powdered sugar until smooth. Spread over the rolls and serve immediately.

Read more...

Greetings, 2010

Friday, January 1, 2010

I think I'm in love with 2010. Well, so far.

First of all, 2010 is a nice, even number. And it looks nice written down. For my anal retentive self, that's a big deal. But that's not really what I'm talking about when I say I *love* 2010.

You see... 2010 is full of possibility and promise, and so much of what will happen this year is yet to be known. As of today, this first day of January--this first day of a new year--2010 has not let me down.

I feel refreshed. I feel hopeful. I'm upbeat.

The book has been closed on 2009. The past twelve months of my life are filed away in my mind. The past twelve months of posts are now in the blog archives.

The new page, it is blank. I'm ready for 2010. Although 2009 wasn't a bad year, I still believe that 2010 could be a better one. And so I greet it, with arms wide open.

What is meant to be will be, and I have good feelings about the next 364 days.

Bring it, 2010. BRING IT.

Read more...

  © Blogger template On The Road by Ourblogtemplates.com 2009

Back to TOP