Penguin Personalization Review and Giveaway

Tuesday, January 24, 2012

This review has been a long time coming, folks. Five months in the making.

Mommy blogger FAIL.

But now, the stars have aligned. Megan over at Penguin Personalization is ready, I've actually remembered to sit down and do this, and all systems are finally a go.

REWINDING... I had so many ideas in my head of what I wanted Nora's birthday party to look like. I settled on an ice cream cone theme pretty early on, and started envisioning the details--the invitations, the food, the cake, a perfect sundae bar with fixings set up straight out of a magazine, the decor... and the birthday girl's outfit, of course.

Because of the timing of our move, I had to let pretty much all of it go (except the outfit!). It was still a nice party and everything was cute--but it was thrown together last-minute and it just did not completely live up to my Martha Stewart-like expectations for myself. But I long ago decided to give myself a break given the circumstances, SO I DIGRESS.

Anyway, a week or so before the party, I realized that I hadn't yet figured out what I was going to do for Nora's outfit. I had found a cute jean skirt I wanted her to wear, but I was at a loss for the t-shirt. I had been searching for something that would tie into our ice cream theme, but hadn't had much luck in stores. Online, I had pinned a number of options, but... I certainly hadn't left myself very much time.

And then I remembered Megan, who started up her own little business, Penguin Personalization. Megan and I "met" 4+ years ago when we were both planning our June 2008 weddings--hers in Louisiana, mine in New York. I shot her a quick e-mail asking if she would be able to do a custom embroidered t-shirt for me, and she not only agreed to get it to me in time for Nora's birthday (only about a week away), but also offered to give the shirt to me for a review AND sponsor a giveaway on my blog. That Megan; gotta love her. Seriously, though, at that time in my life I was possibly more stressed than I had ever been, so Megan was honestly a lifesaver. I almost cried. :)

So, point #1: Megan is flexible, friendly, and a doll to work with.

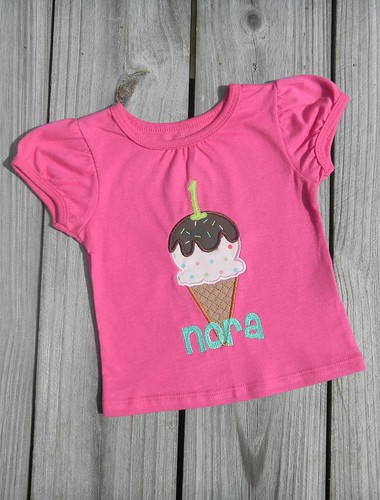
Once I described to Megan what I was looking for--a colorful shirt with an ice cream cone, perhaps Nora's name, and I liked the idea of a cherry on top--she went to work, creating several custom designs for me. She e-mailed me the concepts, and I was really impressed with her creativity. For one of them, instead of just a plain ol' cherry on top of the ice cream, she had made the "cherry" a #1! How cute is that? Of course, we picked that design.
Megan was also really helpful in determining the best size t-shirt to order for Nora. With inconsistent sizing among clothing brands, it can be really difficult to order things sight unseen, but Megan did her best to relay the brands and sizes to me in ways I could relate to (i.e. I was somewhat familiar with Walmart's sizing, and Carter's).

When the t-shirt arrived in the mail just a few days later, I was thrilled with the result. The applique/embroidery is of great quality, and done in a way that doesn't cause any "puckering" or other unsightly problems with the t-shirt fabric. We couldn't wait for Nora to wear it at her party.

As you might know by now, Nora's party was a success, and we received many compliments on her t-shirt. She wore it several more times throughout September, and the embroidery held up just fine in the washing machine.

If you're looking for custom t-shirts for your babes, I highly recommend Megan and Penguin Personalization.

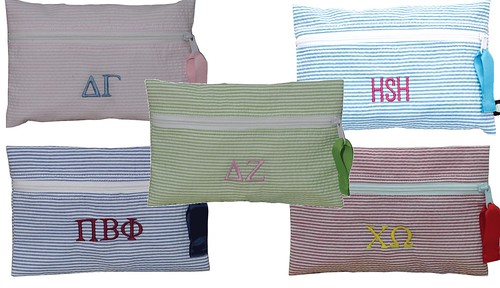
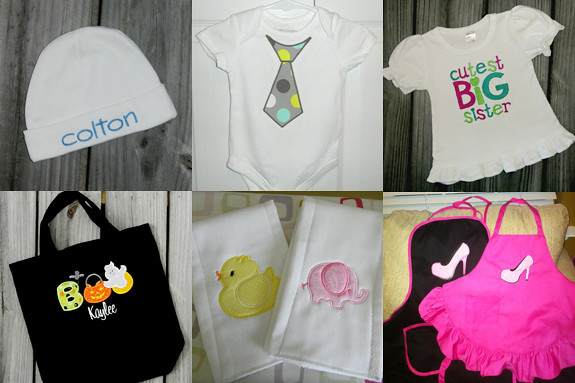
And, she doesn't JUST do t-shirts; Megan has a variety of personalized products available, such as hats, towels, blankets, bags, handkerchiefs, and more. Peruse her website and Facebook pages to see some of her work. If there's something you'd like but don't see, or it's listed as out of stock, be sure to contact Megan directly at penguinpersonalization@gmail.com. One of the biggest advantages to working with her is that she can do pretty much anything (after all, it's personalized, y'all). Here is just a selection of the things she can do:

THE GIVEAWAY

Now... Megan/Penguin Personalization has offered to give away a MINT (brand) Cosmo Bag with an embroidered initial to one lucky Heather Drive reader! These bags (shown below) are really versatile, as they can be used as a makeup bag, wipe case, purse organizer, a case for pens and pencils, etc. Surely you could find a use for it, or give it away as a gift!
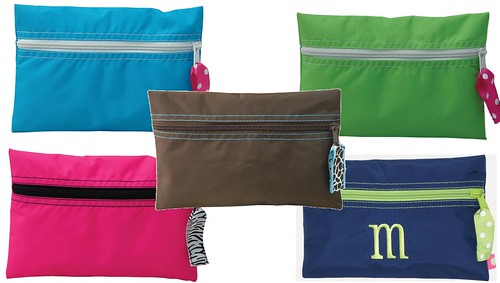
Giveaway Prize:
(1) MINT Cosmo Bag, embroidered with an initial from Penguin Personalization

Please make sure to follow the entry instructions carefully. They're not difficult, but you must follow the instructions in order to be eligible to win.

To enter, simply leave a comment on this post telling me your favorite item/design from Penguin Personalization's website or Facebook page. Also, please leave an e-mail address where you can be contacted if you win.

Limitations:
Only one comment/entry per person. Giveaway open only to residents of the United States. (Sorry to all of my international readers!)

Deadline:
This giveaway will end at 8 p.m. EST on Friday, January 27. Entries left after the deadline will be ineligible to win.

Winner:
One winner will be chosen using random.org. The winner will be announced on my blog and will be e-mailed notification of the win. Winner has 72 hours to respond to my initial contact, or a new winner will be chosen.

Good luck!

Disclaimer: Penguin Personalization provided Nora's custom birthday t-shirt at no cost to me, in exchange for my review of the product. However, opinions expressed within the review are my own. (I hope you know me well enough by now to know that I wouldn't positively review a product that I wouldn't back anyway, whether I paid for it or not!). Penguin Personalization is also sponsoring the MINT Cosmo Bag giveaway.

Read more...

Double Trouble

Monday, January 23, 2012

We went into the pediatrician's office this morning for Nora's ear "recheck" appointment from her latest ear infection diagnosis two weeks ago. I had an inkling that things were not going to go well.

Sadly, we've gotten pretty good at diagnosing Nora's ear infections on our own, just by observing her behavior and her general demeanor. She's usually not miserable, but she's just not herself. A little moody. With a short fuse. Occasional rubbing of the ears. Interrupted sleep.

That last one has always been a tell-tale sign. On Saturday night, she was up--wide awake--for three hours in the middle of the night. Fun times, I tell you.

Anyway, the doctor took a look at one ear and sighed, "That one is a mess." And then she looked in the other one, "That one's not good either."

Let's back up here. December 22: Left ear. January 9: Right ear. January 23: Both ears. The last two were diagnosed at appointments that were supposed to be "rechecks"--in other words, appointments to confirm that infections had cleared. Our poor girl has not been ear infection free since well before Christmas.

The kicker this time was that she had been on Omnicef, which is considered a broad spectrum (a.k.a. strong) antibiotic--because amoxicillin hadn't been doing the job. Now, it appears Omnicef isn't working, either. So, the doctor opted to give Nora injectable antibiotics.

INJECTABLE. Antibiotics.

They're the big guns, y'all. Not cool.

We have to go back tomorrow to have her ears reevaluated, because apparently, these antibiotics are so good that we should see marked improvement in just 24 hours. At that point, the doctor will decide if she needs another round. Rinse and repeat for Wednesday. Poor little Nora is going to be traumatized, I fear. Needless to say, she was not thrilled with the two needles that were stuck into her chubby little thighs this morning.

We also walked out with an ENT referral. We're at the end of our rope with this stuff. We want our baby to get better. We've looked into chiropractors, and it is just not a feasible solution for us right now. We've considered the dairy sensitivity, and will be talking to our doctors about that a bit more, but overall, we're just happy to have the appointment with the ENT (next week) to get a formal evaluation of her condition, and go from there. This isn't the way we wanted this to turn out, but we just want to put an end to this endless sea of ear infections, trips to the doctor, and antibiotics.

Baby steps.

Read more...

Playroom Reveal

Sunday, January 22, 2012

AKA the post in which I show you how we turned a formal living room into a playroom.

Our new house was built in the 1970s, so of course, we have a smaller, cozier family room AND a formal living room. When we first looked at the house, then bought it and moved in, we figured the living room would be kept quite empty for a while. Buying furniture for a room that we didn't plan to spend much time in was pretty low on the list of priorities when it came to spending our money.

At first, the room was an "overflow" room. And when we were ripping down drywall and the family room was under construction, we had all of our family room furniture in the living room. It was a mess. But once we had things under control, we moved everything into its rightful place and the living room was left with... a toybox. So it became a makeshift playroom for Nora.

Over time, we began to embrace the idea of a first floor playroom. And finally, we decided that if we were going to make it a playroom, we should put the effort into "decorating" it as such. We started collecting pieces for the formal living room playroom, and now, we are finally done.

It's funny, because when you walk through our front door, this is actually the first room you see. I suppose it is a testament to the current state of our lives. Hi, we are parents to a young child. :)

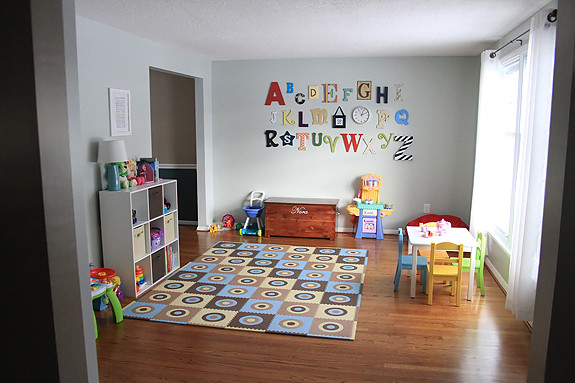
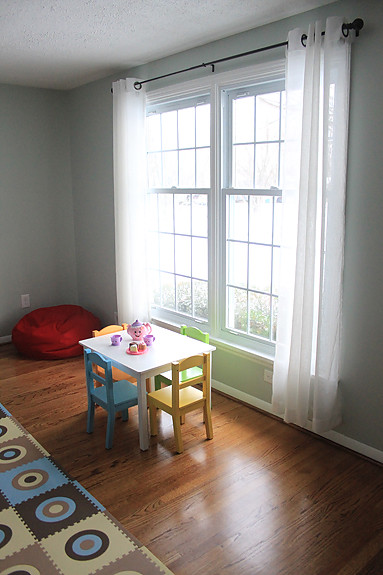
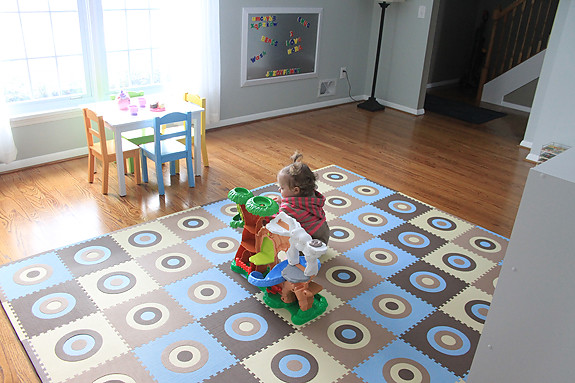
The color on the walls is Sherwin Williams Sea Salt. We actually chose it (and painted it on the walls!) before we even really knew what we were going to do with the room. Looking back, that probably wasn't the right approach, but I think it turned out to be the perfect color. I love it. It's a lovely blue-gray color and really makes this room light and airy.

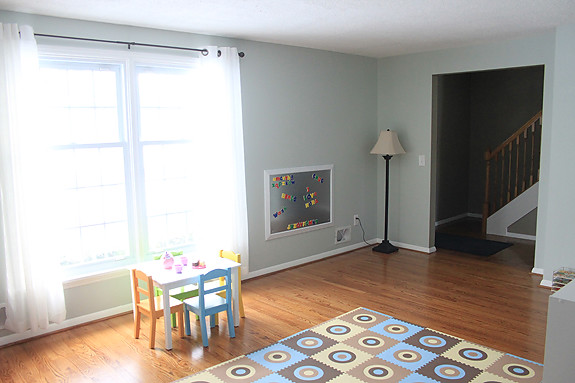
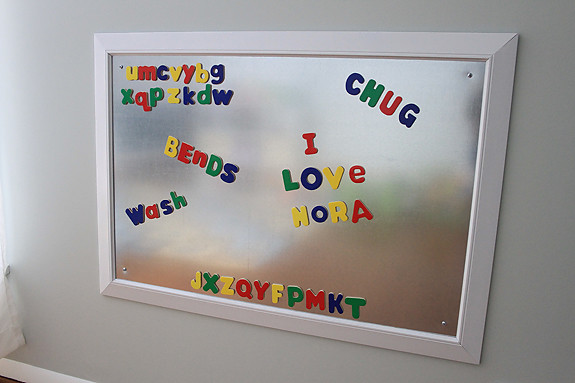
This is a DIY magnet board we made out of sheet metal for Nora (thanks to Pinterest for the inspiration).
Curtain rod and curtains are from JCPenney.

Table by Tot Tutors, purchased at Toys 'R' Us from Santa's workshop. :) We have really been impressed with the little table so far. The pieces are nice and sturdy, the colors are great, and Nora loves it. Win-win-win.
Playmat by Tadpoles, purchased at Amazon.com. We bought three of them to make a mat of this size. This has been great for us, too. For a few months, we sat right on the hardwoods to play with Nora in the then-empty "playroom," and it was really rough on the tailbone (especially one that I swear is permanently damaged by childbirth). This makes things a bit more comfy!

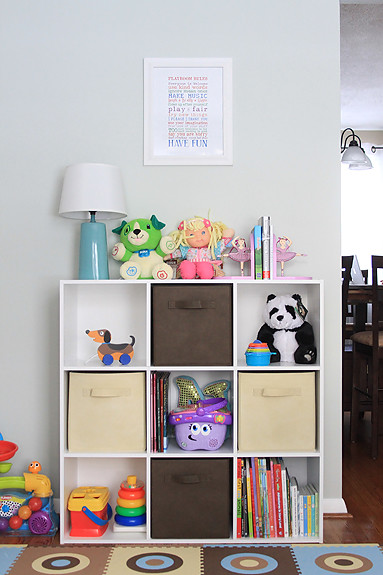
Cube shelf and fabric drawers from Target. This was one of our latest additions within the last several weeks, and it has really helped to complete the room. To have additional, smaller storage to supplement the toy box has been great. Books, smaller toys--they're all easily accessible to Nora, but they now have a place.

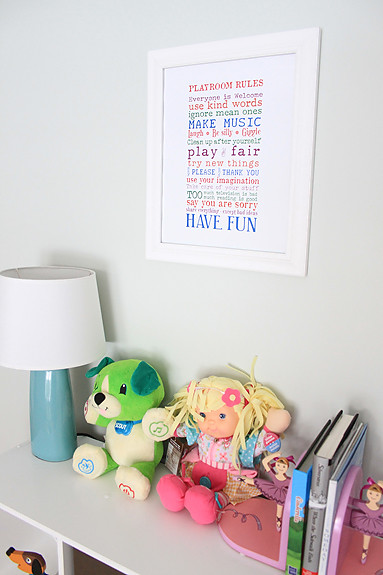
Lamp and lampshade from Target. Art from Etsy. There are dozens of variations of the "playroom rules" floating around Pinterest and Etsy, so there are certainly options. And, subway art is fairly easy to DIY, too. However, this PDF file was only $10 and I figured it was more than worth it for the time I would've spent to try to design something I liked equally as much. I had it printed at Staples for like $2, and bought the frame at Michaels.
More toys organized, but easily accessible to Nora. We also decided to hang her cake smash collage (want a better look? check out this post) in here.
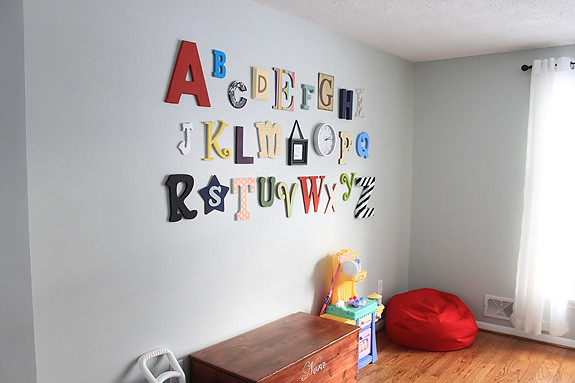
Ah, the alphabet wall. This thing was a labor of love, and totally deserves its own post--so be on the lookout for more details on this project within the next few days. In short, we had a huge wall to contend with, and debated going in a few different directions. But in the end, we fell in love with an alphabet wall I had pinned on Pinterest... the rest is history.

Toy box is by my dad. :)

I know this type of thing probably isn't everyone's cup of tea. Like I said, this is one of the first things people see as they come into the front door of our house! A lot of people would prefer to have playrooms that can be hidden behind closed doors, and toys that can be tucked away. But for us, it was about creating something functional. Instead of furnishing and decorating a room that would be rarely used, we went with something that is utilized on a daily basis.

In this room, Nora can play with all of her toys just a few steps away from us while we're making dinner. When we have company over (almost all of whom have children of their own), our kids can play together in the next room while we enjoy some adult conversation. We envision that this room will get a lot of use during our years with young kids. At some point, when they're a little older, we'll move the playing into the finished part of our basement, and this room will transform into something else. Until then, our little girl enjoys it every day. See?
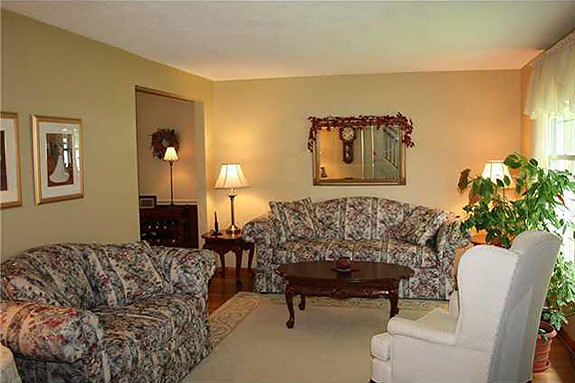
Making sure to come full circle--here are the "before" pics. First, with the sellers things:

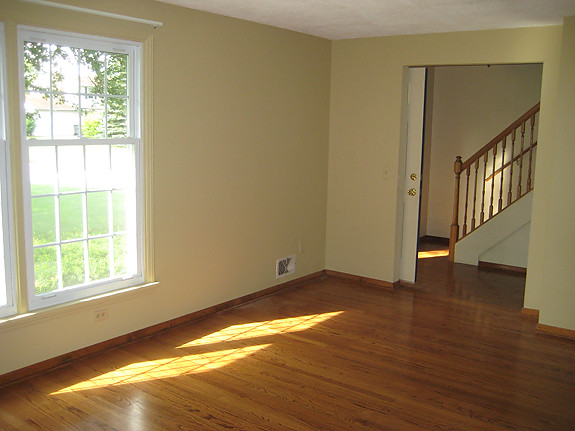
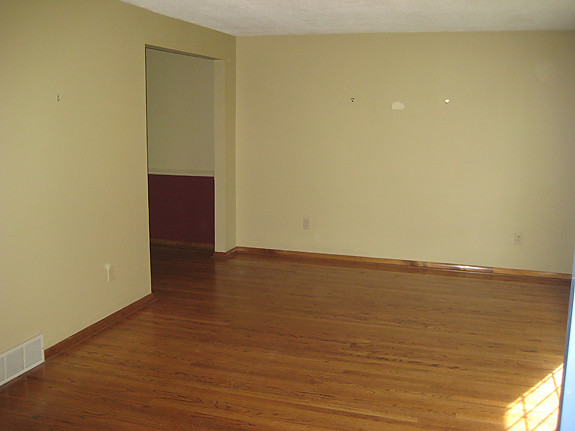
And then on the day we moved in:
And one more time, here's our after:
Overall, this was a really fun room to work on. It took some time, but mostly because we just collected items little by little. Once we decided to truly "finish" it, everything came together very quickly. I wish the kitchen could be this easy!

Read more...

Gated Community

Thursday, January 19, 2012

You'd think that with the (seemingly) hundreds of baby gates on the market, it would be easier to find one that actually works and fits in the spot you want to put it. But we're not having much luck, and we have an increasingly mobile and curious toddler who thinks that climbing the stairs is the most.fun.activity.EVER.

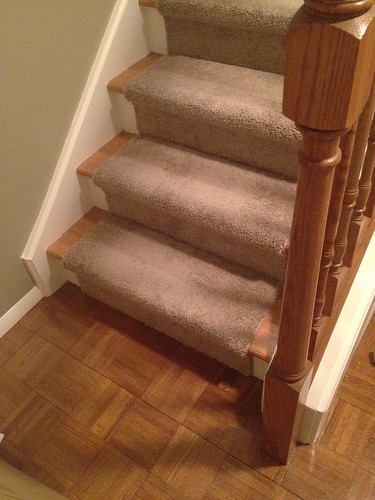
Our biggest problem lies in our banisters. The one at the bottom of the stairs is pretty tall, so we can't find a gate tall enough to be able to line up the tension rods with the flat parts of it. So we figured we'd have to get one of those banister kits to adapt the best/tallest gate we could find--a Dream Baby Extra Tall security gate--but then we noticed that when we use the tension rod against our sorta-loose banister, the tension was actually forcing the banister over to the side a bit, causing some of the molding surround the banister to rip apart. NOT GOOD.

The other issue with the bottom of the stairs is that I guess you're supposed to put the gate on the bottom stair, as opposed to the floor? If that's the case, we've got bigger problems since we have a pretty thick and cushy carpet as a runner, making the surface area unlevel when you go from left to right.
For the top of the stairs, we have the same type of banister, but it's a bit shorter. We bought a Summer Infant Sure and Secure Extra Tall gate, because it was one of the only ones I found that was (hopefully) the right height AND could be hardware mounted (a safety requirement for top-of-the-stairs placement). We don't have it in our hands yet, because our local Babies 'R' Us and Toys 'R' Us stores were out of stock, so we had to have my sister-in-law pick it up for us in the city where she goes to college, and we won't see her again until Saturday. But since the banister is a little loose upstairs, too, I'm nervous that this won't work, either. When you hardware mount, does it still require tension against the surfaces you're mounting on?

Our trim molding is not the easiest thing to deal with either, as it also semi-interferes with mounting--both tension and hardware styles. Fun.

And then there's part of me that is thinking we should just save our money and buy a cheap, removable-on-a-daily-basis gate that we can somehow rig at the bottom of the stairs, and just very carefully supervise (like we have been) whenever we're upstairs. At what age do kids generally learn how to go down stairs safely? When are they old enough to start teaching them to scootch down on their bellies, backwards?

For downstairs, if we can't figure out a bottom-of-the-stairs solution, our only other option is to put a gate in the doorway to our kitchen, then put a (very wide, and probably very expensive) gate across the opening into the playroom, effectively blocking off our entire foyer. This is less appealing to me because I feel like the gates will be more "in your face" this way, as opposed to being relatively inconspicuous in our stairway.

What do you think? Any suggestions for us based on our photos? Do you live in a "gated community," or do you let your kids roam free? If you do the former, what is the system you've found works best for you? If the latter, how on earth do you keep your kids away from stairs and/or watch them every second?

Read more...

A Bitch of a Kitchen

Tuesday, January 17, 2012

We moved into our new house in August. Five months later, and I've shown you very little of it. You've probably caught glimpses here or there, but I haven't openly documented how much this place has changed.

It sort of makes me feel unaccomplished, like we haven't truly finished anything. But we're actually working on putting the final touches on a few rooms right now, so I hope to be sharing some official before and after pics soon.

But first, I thought I'd start by showing you the room in our house that is next up on our list of projects. It's arguably the most important room in the house. And, oddly enough, it's the room I currently hate the most. It's received very little cosmetic love and attention thus far.

That room? It's the kitchen.

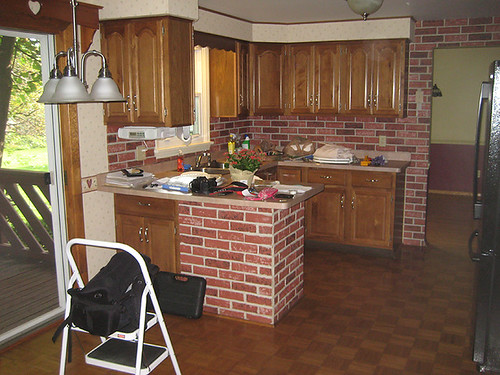
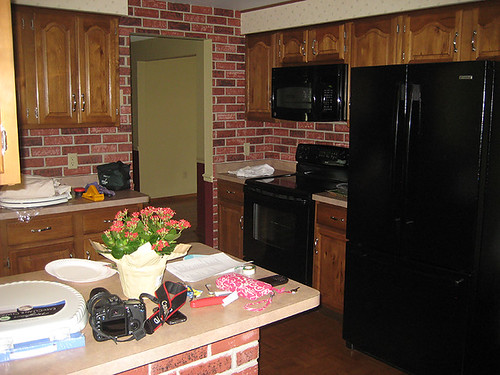
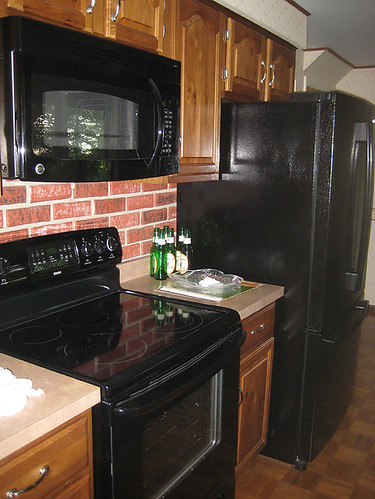
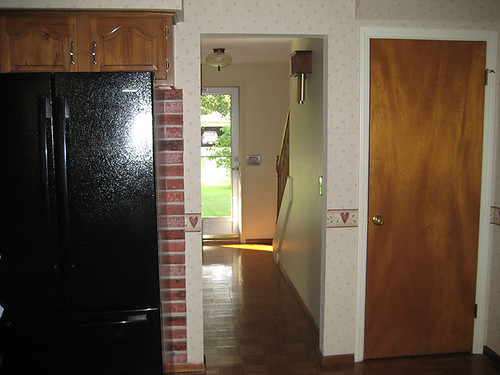
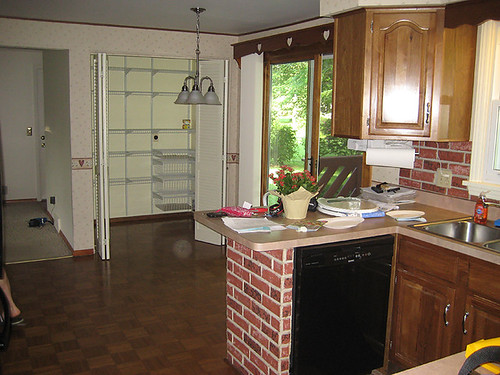
Behold: Photos of our ugly-ass kitchen, from the day after we closed on the house.


Yes, that is an ungodly amount of z-brick. Yes, those are parquet floors.

Yes, that is shoe molding being used as crown molding.

Yes, the z-brick even goes behind the refrigerator. Lucky us.

Oh, and YES, that is rosebud wallpaper, with a heart border, all of which was just installed in--wait for it--2009.

And let's not pass up the opportunity to admire the wooden heart valance/shelf thingy up above the sliding glass door.

*sigh* We have our work cut out for us, don't we?

A few things have changed. We couldn't rip down that wallpaper fast enough, and the heart shelf/valance thing was an early casualty. We also tore out the z-brick that surrounded the dishwasher. We moved our laundry from the basement to that gigantic oversized pantry (there were already laundry hookups in there). But then we got overwhelmed and distracted with other things, so the kitchen is just in a state of... ugly. Unfinished ugly.

In September/October, we ripped our family room ceiling and walls down to the studs and put up new drywall (with help from my dad, and our friends Emily and Pete). After that monster of a project, we were beaten down. So, we took a break from big projects, choosing instead to tackle things like painting and window treatments and replacing all of our hollow wooden interior doors with six-panel slab doors. And then we got through the busy holidays.

Now? Now, it's January, it's a new year, and we are ready for a project. A BIG project.

We are preparing to tackle that beast of a kitchen. To rid ourselves of z-brick forever, we have to (temporarily) remove all of the upper cabinets, the countertops, and a couple of the base cabinets in order to rip the upper portion of the walls down to the studs. Then, we'll put up new drywall, and tape/mud/sand it all. We also have plans to paint the cabinets, install a tile backsplash, replace some of the fixtures, and... replace the floors.

I'm not going to lie to myself this time; this is going to take a while. But instead of dropping off the face of the earth and stopping in to blog only occasionally with "OMG WE'RE SO BUSY, MY HOUSE IS A HELLISH MESS, I'M GOING TO DIE" posts, I figure that I'll try to keep you all updated on where we are in the process. You know, so you can live in kitchen renovation hell right along with us. :)

Right now, we're finishing up the research/planning stages, but we hope to start to buy materials in the next few weeks, and finally begin making progress (DEMO!!) in early February. We're somewhat intimidated and are still in search of a little help (Bueller?) but it has to be done! Living without a kitchen is never fun, and living without a kitchen with a toddler is like... have I used the word hell yet?

And so the countdown begins...

Have any of you tackled a big DIY kitchen renovation? Anyone have any experience with removing z-brick? How about (safely, temporarily) removing countertops without damaging them? Anyone just want to sympathize/empathize with my ugly kitchen woes? :)

Read more...

  © Blogger template On The Road by Ourblogtemplates.com 2009

Back to TOP