
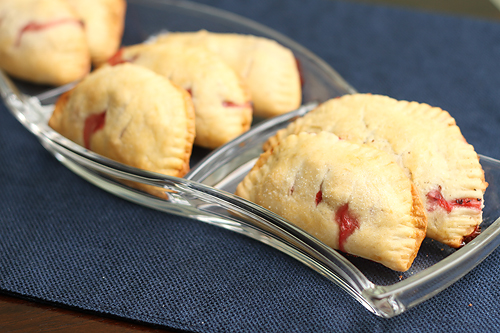
Blueberry & Strawberry Hand Pies
Thursday, July 8, 2010
Pies.
Mini pies.
Pies that fit into the palm of your hand.
And can be eaten with your fingers.
Need I say more than that? I mean, really.
I've seen a few different versions of these pop up on food blogs that I frequent, but when I saw them appear on Beantown Baker last week, I decided that I simply *must* make them while strawberries are still in season. And then, I thought--why just stick to strawberry? I shall make half of them blueberry instead.
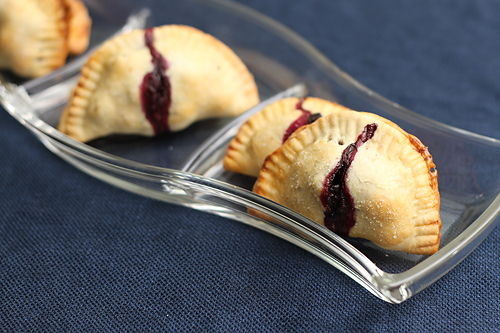
And so I have a boatload (OK, not really--the dough recipe made exactly 20 for me, just like it says) of itty bitty strawberry AND blueberry pies waiting to be carted off to the Poconos with us this weekend. Wheeee!
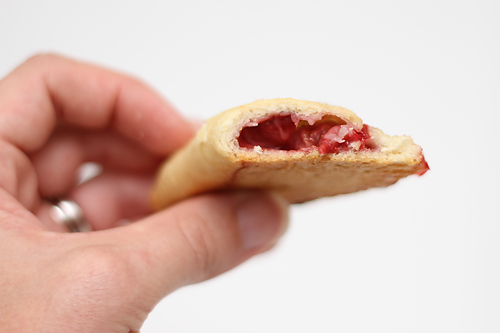
As you'd probably expect, these are a bit on the time-consuming side. At first, I kind of panicked about how long it took me to make just two hand pies, but after that, I fell into the swing of things and my technique got better, so it wasn't as bad as I thought it might be. And they're cute, aren't they? Totally worth a little extra effort.
One thing you should know is that these aren't as sweet as you'd maybe think--even though they are sprinkled with extra sugar on the outside. I find that the fruit filling is actually a bit tart! (Scrumptious, of course... but tart.) I saw on Delicious Meliscious that she actually brushed the outsides of her hand pies with a sweet glaze. I might try that next time for a little additional sweetness.
I can't wait to try these with apples in the fall.
Note: I made half of the strawberry filling from Beantown Baker, and half of the blueberry filling from Delicious Meliscious, and only one recipe of the pastry dough. These are the measurements and amounts I've included below. However, if you'd like to stick with one flavor or the other (strawberry OR blueberry, but not both), make sure you double the filling recipe back up so you'll have enough to go around.
Blueberry & Strawberry Hand Pies
(Sources: Beantown Baker and Delicious Meliscious)
Ingredients:
For the pastry dough:
- 9 1/2 ounces all-purpose flour, approximately 2 cups
- 2 tsp. baking powder
- 3/4 tsp. kosher salt
- 2 1/2 ounces shortening, approximately 6 tablespoons
- 3/4 cup milk
- 1 egg mixed with 1 to 2 teaspoons water
- 2 tsp. baking powder
- 3/4 tsp. kosher salt
- 2 1/2 ounces shortening, approximately 6 tablespoons
- 3/4 cup milk
- 1 egg mixed with 1 to 2 teaspoons water
For the strawberry filling:
- 1 pound of strawberries (~2 cups, hulled and chopped into small pieces)
- 2 tbsp. flour
- 2 tbsp. sugar
- Pinch of salt
- 1/4 tsp. vanilla extract
- 2 tbsp. flour
- 2 tbsp. sugar
- Pinch of salt
- 1/4 tsp. vanilla extract
For the blueberry filling:
- 1 cup blueberries, fresh or frozen (thawed)
- 1/4 cup sugar
- 2 1/4 tsp. cornstarch
- 1/4 tsp. cinnamon
- 1/4 cup sugar
- 2 1/4 tsp. cornstarch
- 1/4 tsp. cinnamon
Directions:
1. To make strawberry filling, mix all ingredients together and set aside.
2. To make blueberry filling, mix all ingredients together and set aside.
3. In the bowl of a food processor, combine the flour, baking powder and salt. Pulse for a few seconds and then pour into a large mixing bowl. (Since my food processor parts were dirty and in the dishwasher already, I skipped that part and simply whisked the dry ingredients in the large mixing bowl. Funny that I didn't notice any ill effects from doing so--surprise, surprise! I think Alton Brown makes things more complicated than they need to be.)
4. Add the shortening and knead it into the flour with your hands until it is crumbly.
5. Add the milk all at once and mix in with a spatula until it begins to come together.
6. Lightly flour your hands and the countertop and turn the dough out onto the countertop. Knead the dough ball, folding over 10 to 20 times.
7. Using a rolling pin roll the dough to 1/3 to 1/2-inch thickness, then cut into rounds using a 2 1/4-inch ring. Roll each round as thinly as possible or to 5 to 6 inches in diameter. (This might take a little practice to get right--but the dough should be REALLY thin, just one step above tearing apart.)
8. Spoon 1 to 2 tablespoons of filling onto the dough, brush the edges of half of the dough lightly with the egg wash, fold over and seal the edges together with the tines of a fork, dipping it into flour as needed. Gently press down to flatten and evenly distribute the filling and snip or cut 3 slits in the top of the pie.
9. Brush a little bit of egg wash on the outside of the pie and sprinkle with decorating sugar.
10. To bake pies, preheat the oven to 350 degrees F. Place finished pies onto an ungreased cookie sheet and bake for 25 to 30 minutes or until golden brown.


4 comments:
Yum, yum! This looks absolutely delish! Thanks for sharing the recipe.
I stumbled across your blog the other day when I was blog-surfing and I have to say that I adore your "Heather Drive" header! Where did you find the street sign, or did you make it?! I wanted to use something like that as my Twitter avatar, but couldn't find it anywhere. :) Love it!
Thanks, Heather. I'm glad you found me! :)
The background/street sign for the header is an actual photograph I took. It's a real street in the neighborhood my mom grew up in (and I lived there for a while when I was little, too). That's how the blog name came to be, so it only seemed fitting to use a photo of the actual sign.
They look yummy
Yours turned out so cute! I agree that AB sometimes makes things difficult. I didn't use the food processor either.
Post a Comment