DIY Reindeer Candy Bar Wrappers
Wednesday, December 21, 2011
I have Pinterest to thank for this one. I saw these homemade reindeer candy bar wrappers and pinned them a few months back, because right away I knew that this would be an excellent little gift to make for my team at work.
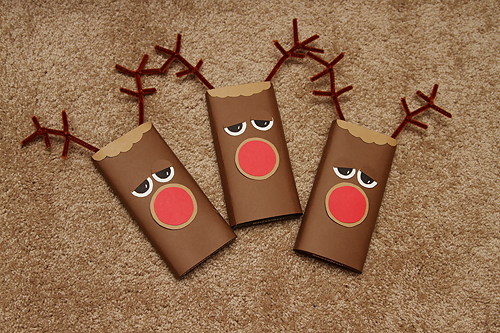
They were really easy to make, though a little time consuming because of all the little paper pieces that need to be cut. If you have circle punches of various sizes, I'm sure this would go much more quickly, but I don't have them and didn't want to buy them specifically for this project. Even though I traced and cut all of the circles by hand, I was able to make six of them in just a few hours while sitting in front of the TV. I enjoy a good paper craft, so I thought it was fun. :)
The link to the original tutorial is broken, but these are not hard to figure out just based on the photos. I do have to give a big shout-out to Stacey Carter (www.staceystamps.com, which no longer appears to be a valid website), who posted the photo of these, though--as these are obviously completely based on her design.
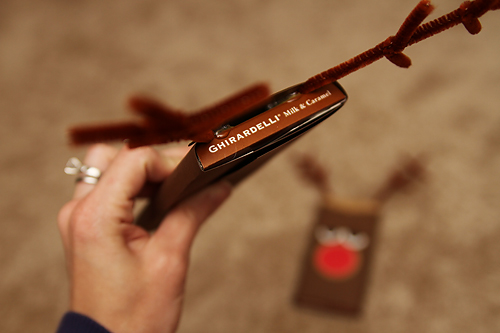
I used Ghirardelli chocolate bars instead of Hershey's because, well, I thought it would be nicer. But if you're a Hershey's kind of person, by all means, save yourself some money and get Hershey Bars.
Here are the supplies that I used, and a rough description of how to assemble these guys.
Supplies:
- Brown pipe cleaners
- Cardstock (dark brown, light brown, white, black, and red)
- White paint pen
- Hot glue gun
- Glue dots
- Scissors
- Chocolate bars
- Various circular shaped objects of different sizes to use for tracing (see notes below for objects I used)
Instructions:
First, I laid the chocolate bar on top of a sheet of the dark brown cardstock and marked the length, then cut. I then wrapped the cardstock around the bar so it connected at the back, cutting off the excess. I attached the cardstock to the front of the bar using a few glue dots, then secured it to the back using a few more.
I traced and cut all circle shapes. Two white and two black circles for the eyes, one dark brown circle (then cut in half) for the eyelids, and light brown and red circles for the nose. I sketched the little "ruffle" part at the top of the head freehand, then cut that out, too.
To attach everything together and to the candy bar, I used a mixture of glue dots and hot glue. I used the big "3D" glue dots to glue on the noses, because I liked how they stood out away from the face a little bit.
For the eyes, glue the black circle onto the white circle, then the brown half-circle on top of that. Use paint pen to draw a little "glimmer" on the black part of the eye. When dry, attach the entire eye to the face.
For the antlers, I cut one pipe cleaner in half to use as the two antlers. Then I cut a second pipe cleaner into smaller pieces, and wrapped the smaller pieces around the large pieces to make additional points. I secured the antlers to the candy bar by running a line of hot glue along the bottom portion of the pipe cleaner, then sticking it in between the card stock and the candy bar, pressing firmly to set.
Note: OK, so the circular objects I used for tracing? I found most of them in my kitchen. For the white part of the eye and the dark brown eyelid pieces, I traced the large end of a cake decorating tip. For the black part of the eye, I traced the end of the "plunger" part of one of Nora's ibuprofen syringes. For the light brown portion of the nose, I used the roll of glue dots, tracing inside the cardboard roll that they come on. For the red nose, I used a measuring spoon (the tablespoon). You can use anything, really. Just look around for circles that vary in size so you'll have the nice textured/layered look with everything.
I think that sums it up! Let me know if there are any questions.
Only three more days until Christmas (since today is nearly over)! Do you have your shopping done? Any last-minute Christmas crafts planned?


3 comments:
Awesome! I saw these on pinterest. Such a fun little holiday craft :)
These look awesome :) I am done with my Christmas shopping but I need to drop in a card at my work and write another Christmas card for my cousin. I would say that I have done everything but Mum has a list of chores for me of things to do!
I made these for my year 8 form class as a gift - 24 of them! Most of them took them home to show their parents instead of tearing straight into them. Totally worth the time and effort.
Post a Comment