
Trick or Treat
Saturday, October 31, 2009
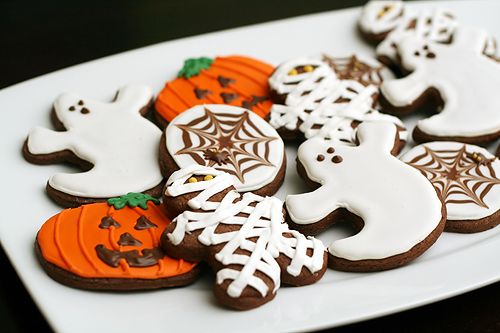
It has been a while since I've made and decorated cutout cookies. In fact, I'm pretty sure I haven't made them since Easter! And that's just crazy.
So, when I found out that my brother and his fiancee were going to host a Halloween party, I figured I just had to make some festive cutouts. Especially since I made them last year. (When I made the Halloween cookies last year, that was actually my first time using royal icing!)
Add in the fact that I saw this new variation (it's chocolate!) of my favorite cookie recipe, and it was a done deal.
These taste frighteningly similar to the crust on chocolate Pop Tarts. Specifically the chocolate fudge version. But they're better, because they're soft and chewy, and 'cause DUH... they're homemade.
They're so good, in fact, that it's going to be really tough to decide which version to make for Christmas cookies. Perhaps I will have to try them both, head to head in a taste-off! (It's not an easy job, but somebody's gotta do it.)
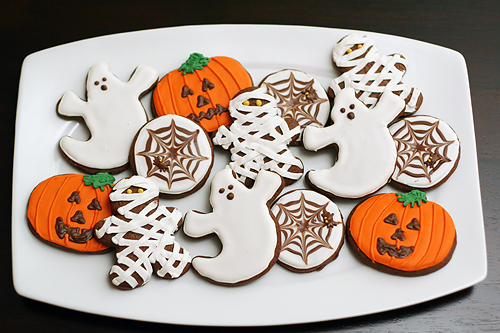
Should you want to make spiderweb cookies, check out Katie's instructions for those.
Soft Chocolate Cookies
(Source: Good Things Catered)
Ingredients:
- 1 1/2 cups butter
- 1 1/2 cups granulated sugar
- 1/2 cup powdered sugar
- 4 eggs
- 2 tsp. vanilla
- 4 1/2 cups flour
- 1 cup cocoa powder
- 2 tsp. baking powder
- 1 tsp. salt
- powdered sugar, for rolling
Directions:
1. In bowl of stand mixer, add butter and sugars and beat until light and fluffy in texture, about 3 minutes.
2. Add eggs one at a time, mixing thoroughly.
3. Add vanilla extract, beating to combine
4. Sift in flour, cocoa powder baking powder and salt a little at a time. Be careful not to over mix, this process should take about one minute.
5. Place dough in fridge for at least 30 minutes or up to a week.
6. Preheat oven to 400 degrees and line baking sheets with parchment.
7. Roll cookies out to 1/2 inch thickness, cut to desired shape and place on parchment.
8. Place baking sheet in oven and bake cookies for 7-8 minutes. (You want to "underbake" them by about a minute. Don't wait until they get crispy--they won't be soft and chewy!)
9. Wait until cookies are cooled completely before icing.
HAPPY HALLOWEEN!


4 comments:
I love the mummy cookie!!
These are adorable. I love Halloween!
Oh my goodness Heather, these cookies are FANTASTIC!!! I loooove the mummy! Actually, I love all of them! They turned out so well! The contrast of colors you used are fantastic!!
These are SUPERB!
Post a Comment